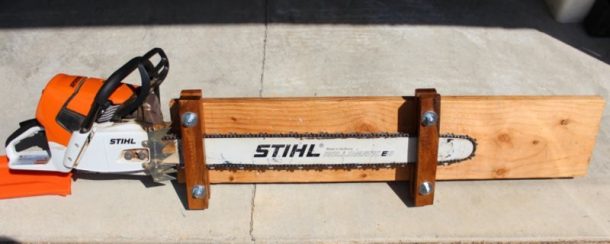
Alaskan Sawmill Clamp Download Page

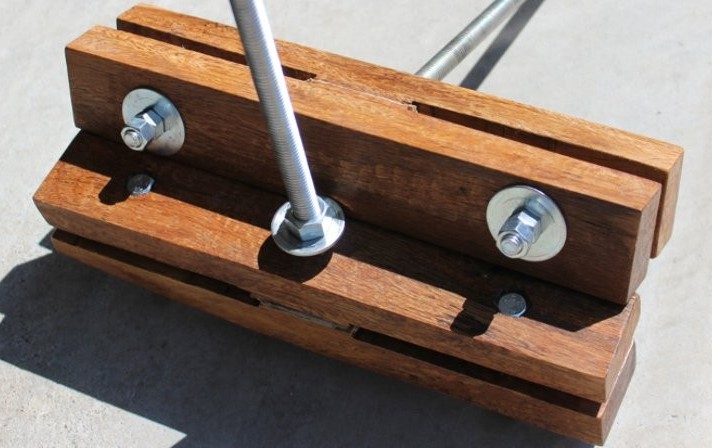
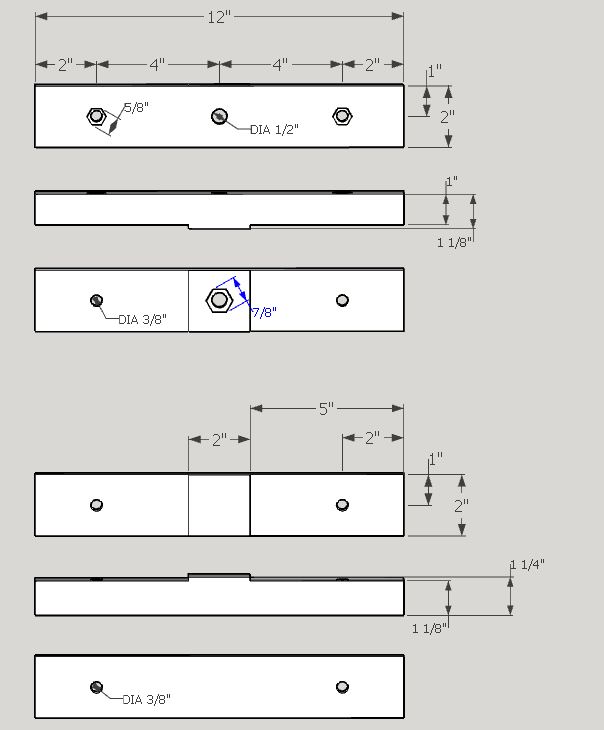
For these clamps, you will need 4 pieces of stock.  I have upgraded from standard  2×4 stock because I found that it wasn’t rugged enough for the abuse.

I have chosen Live Oak for my upgrade but any hardwood will probably work as well.  Preferred species would be Hard Maple, Hickory or Ash.

My stock is 2 inches wide, the top piece is 1 1/8″ thick and the bottom is 1 1/4″.  The top dimension thickness is so that my minimum cut thickness is 4/4 stock.  The bottom clamp piece thickness dimension is not important but will determine the length of your bolts.

Sequence of Operations:

When drilling the recesses for the bolt heads, drill the recess first then the through hole.  You can drill the minor diameter (measured across the flats of the bolt head) of the bolt head and then chisel out the flat areas or set the bolt heads in Epoxy.  I have chosen to keep the bolts loose in their mountings in case the clamp slips and digs into the bolt ( I can easily replace the bolt but I still have a dull chain to deal with).

Once the holes are drilled then recess the underside of the top clamp piece.  Alternatively, you can glue a thin piece onto the center of the clamp ( I would use Epoxy for strength).  But remember to adjust the thickness dimension if you do this.

When you are finished making the clamps add a small piece of rubber to the inside of both clamps.  This will keep the saw blade from scratching and provide more friction for the clamps ( I cut a piece off a Rubbermaid glove but rubber shelf liner works well too).


Download the PDF Drawing Here

You will want to make another recess in the bottom of the guide board for the top nut (Under the guide board on top of the clamp or spacers if they are used) on the threaded rod.  This can be drilled out at 7/8″ or larger as the nut will need to be tightened and may end up in a different orientation each time it is tightened.  A spade bit will work well for this.  Insert a temporary plug into the 3/8 inch hole if you have already drilled it to keep the center of the bit tracking well.

Alaskan Sawmill Project | Revisited and Refined

Alaskan Sawmill Project | Revisited and Refined

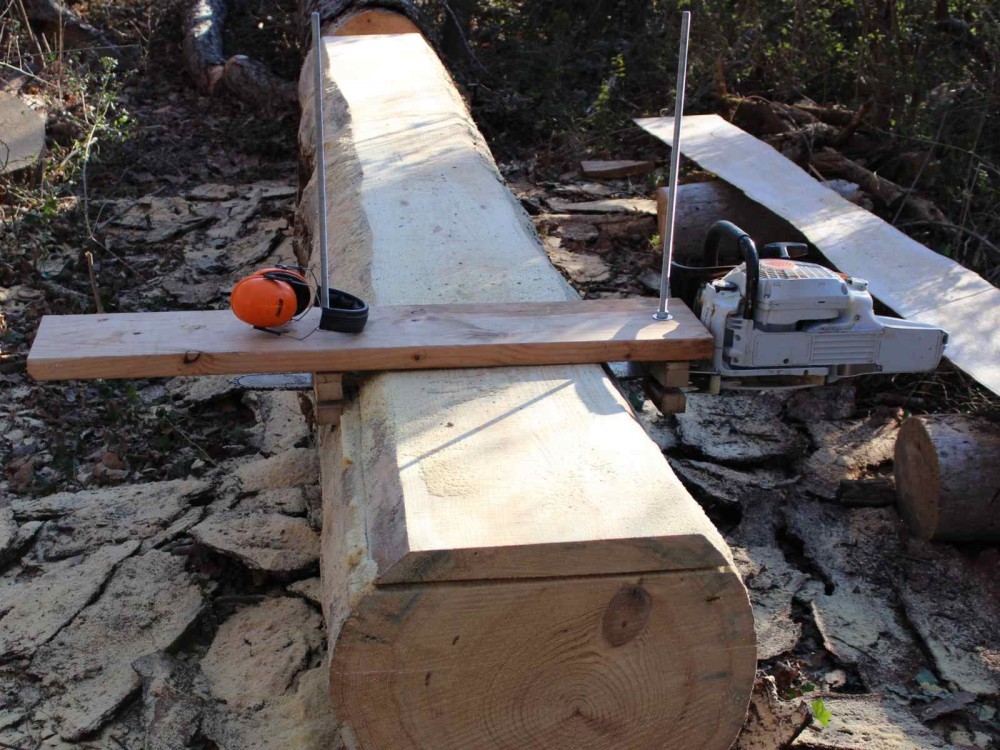
In the fall of 2017,  I created a  homemade Alaskan Sawmill. You can read a little bit about it on the page for the Alaskan Sawmill Project. I was able to slab a cherry tree and two large chunks of the yellow pine tree. I also worked on some of the live oak down in Hilton Head.

New Alaskan Sawmill Jig

I made the original  Alaskan sawmill jig from common materials that I bought at one of the big box stores.  It was made from softwood. With all the cutting that I was doing the pine didn’t hold up very well. Eventually, the bolts that I was using to hold everything together caused the Pine to split. The bolts also worked their way into the pine causing the clamp to run out of thread to hold the clamps tight onto the saw blade. This caused the clamps to slip and my chain impacted the bolts and dulled yet another chain.

I have been sharpening the chains and this time I was still able to sharpen the chain. It wasn’t as heavily damaged as the first time that I had the problem. I did have to adjust the depth gauges as I have taken off quite a bit of metal with the repeated sharpenings of the chain. I’ll be continuing my work on the Live Oak down in Hilton Head next week. With any luck, the chain will perform well. As a backup, I have purchased a brand-new ripping chain. I’m currently using the 30 RP  from Woodland Pro. I have found that the ripping chain works much better than the crosscut chains for this work.

I have noticed that there are some problems with the jig the way I put it together. Of course, the first problem is that I used softwood. So for my new jig, and since I was cutting Live Oak anyway, I grabbed a little bit of Live Oak and put it on the radial arm saw and cut out new blanks for my new jig.

A Fresh Jig to Correct the Problems

The first problem that I ran into was that the softwood, the pine, wasn’t sufficiently strong to keep from bending when I tightened the clamps. The other problem that I ran into was that over time the washers that I used under the head and bottom nuts began to work their way into the pine. The 3/8 inch bolts that I used were 4 inches long and were only threaded for part of the way. As the pine compressed  I ran out of thread to efficiently tighten the clamps.

Eventually, the loose clamps allowed them to slip, this chewed up the center section that held the clamp off of the chain. It made the clamps unusable.

The other problem that I had was that each time I went to tighten the clamps I had to loosen the board at the top put a wrench on the top of the Bolt so that I could tighten the lower nuts. This got to be a major pain in the backside. When I originally designed it the jig was set up for a 2-inch thick cut (8/4). It would be very nice if I could cut 4/4Thick boards instead of the full 8/4. I can still add spacers to bring it up to a larger thickness if I’d like.

I had a piece of 3 foot long Live Oak that I brought back to create my new jig. I had to do some judicious cutting to get stock that was thick enough and wide enough to use on my new jig ( the piece is one of the outside cuts so it wasn’t even close to flat or straight). Eventually, I was able to create two pieces that are 2 inches wide, 12 inches long and 1 1/8 inch thick. I also cut two pieces that are 12 inches and 2 inches wide but are an inch and 1/4 thick. I use these for the bottom pieces, the top pieces are the 1 1/8 inch thick pieces.

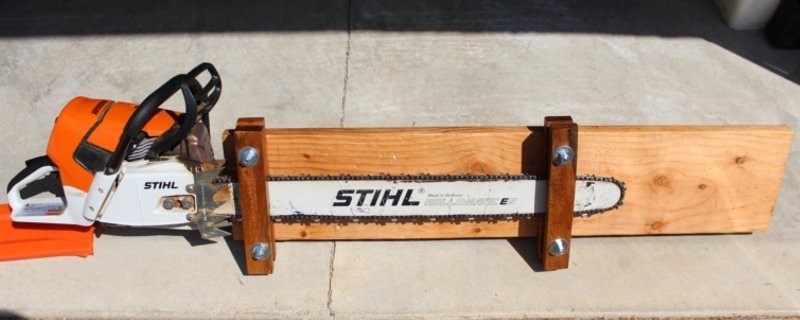
My chainsaw blade is 3 inches wide at the base and 2 1/2 inch wide at the end. So I chose a 2 x 2 section in the center of each clamp to be full width. I relieved the ends, 5 inches on each end, by 1/8 inch so that the chain will clear the clamp.

In the center of the full-width section, I cut a half-inch hole and on the inside, I chopped out a hexagonal space 1/2 inch deep to house the nut for the threaded rod. At the ends of each top piece, I drilled a 3/8″  hole that was positioned in the center and 2 inches in from each end. I placed the bolt into the hole and marked out the top of the bolts. I then recessed the top of the bolts so that they fit into these recesses flush with the surface.

Moving on to the bottom piece, I clamped the two pieces together and continued the 3/8 inch hole through the bottom pieces on either end of the piece.

Finally, I glued the half-inch nut into the recess on the bottom side of the top piece for each clamp.


The Resulting Jig

I recessed the bolts that hold the clamps together into a hexagonal recess to keep them from turning.  This allows me to only need one wrench to tighten the nuts that hold the clamps together.  At this point, I haven’t glued the bolts in.  I’ll consider this if it becomes an issue with play as the jig is used.  Since I have chosen Live Oak as the material for the clamps, I don’t expect that this will be an issue.

Alaskan Sawmill Clamp Details

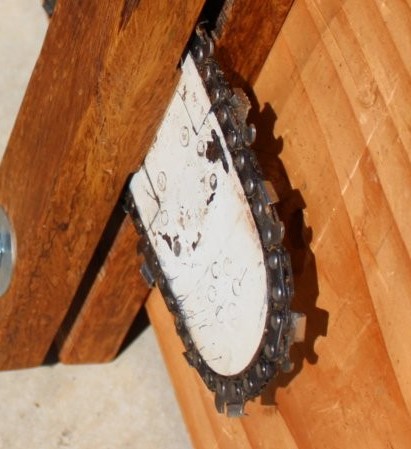
I also glued some rubber from a pair of heavy-duty rubber gloves onto the inside of the jig where it contacts the saw blade.  This should cushion the blade a bit and provide additional friction to keep the clamps from sliding.  While the clamping pressure seems to be sufficient, I will only know that it is sufficient after a few passes through some trees.

You will notice that there are two nuts on the bottom of the clamping bolts.  The second jam nut provides extra security so that the clamps won’t slip.

Here you can see the back clamp in place.  I have centered the clamp in the middle of the saw blade.

Alaskan Sawmill Back Clamp Detail

The next image shows the front clamp in place.  Notice that there is a much thinner blade at the front end of the blade.  This was the determining factor for the size of the clamping pads.

Alaskan Sawmill Front Clamp Detail

I have also made a series of spacers that will go between the top of the clamp and the guide board if I wish to cut thicker slices from the trees that I am milling.  With the current dimensions and no spacers, I expect to get full 4/4 boards.  I will complete the Live Oak with 8/4 thickness so I will need to add a 1-inch spacer between the clamp and the guide board.

I have cut spacers that are 9 inches long and 1 1/2 to 2″ wide ( I was cutting these from a 2X4 so some are 2 inches wide and some I just got lazy and used the thickness of 1 1/2 inches).  The thickness of these spacers vary.  I have 1 1/2″, 1″, 7/8″, 3/4″, 1/2″, 3/8″, and 1/4″ thick spacers. Stacking these under the guide board I should be able to vary the additional thickness by 1/8″ from 1 inch thick to 2 7/8″.  If I need to go beyond that, I have some additional 1 1/2 inch blocks and some 3/4″blocks that are 5 inches long. for additional spacing.  If I decide to cut some 6 x 6 timbers, I can find enough spacers to mix and match to a 6-inch depth.

This set of clamps is made from the Live Oak that I am cutting in Hilton Head.  I am amazed at the denseness of the wood.  It is amazingly heavy.  I know that it still has a lot of moisture in the wood.  It has been air drying since 2016 but given the density, I can see this wood taking a very long time to reach a dry state.  If you are considering duplicating a set of clamps, I would recommend that you use Hard Maple, Hickory or another hardwood. Pecan would probably work well for this sort of project.  The Live Oak is a variety of White Oak.  Standard Northern Red Oak would probably do as well although it is considerably less dense than Live Oak.

Currently, I put a Tung Oil finish on the wood to slow down the moisture loss.  This should keep the clamps as stable as possible as they continue to dry.

Let me know in the comments how they work for you.

Yellow Pine Chainsaw Project


Sometime last fall (Fall of 2017) there was a windstorm that took down a huge yellow pine tree in our woods.

My Girlfriend’s brother decided that the trail needed to be cleared and proceeded to hack the first 16 feet of the tree into small rounds, presumably for firewood.  Some of this I split and stacked into firewood to season.  I moved only what was in my way so that I could attack the remaining straight section.  This was about 25 feet to the first crotch of the tree.  At the base, the tree was 23 inches in diameter.  The top of this section slimmed down to around 18 inches.  Beyond this, 12-inch branches spread out into the canopy of the tree.

yellow-pine-milling-second-cut

I decided to attempt 2 sections measuring 13 feet and 11 feet.  I needed to remove a section between the two so that I could get my chainsaw jig out of the first section before I started on the second.  I estimated at 18 inches would be sufficient for me to walk around the log and get the Alaskan Chainsaw jig out of the end of the tree as I cut.

I set up the jig to cut the minimum depth.  This is slightly over 2 inches.  Until I redesign the clamping part of the jig, I’m stuck with this.  I don’t have a problem with 2 inch thick boards from a 23-inch tree.  There should be some nice planks for table tops and supports with this dimension. The drying process will also produce flatter and more stable stock at this dimension.

I cut the first two slabs from the top of the 13-foot section at the 2-inch dimension and when I reached the third board, I added a few spacers to the Alaskan Sawmill to give me a full 5-inch thick board.  I was just above the center of the tree at this point as I had cut a leveling cut from the top at about 2 inches and 2 more at 2 inches then with the 5-inch board I was at about 11 inches in plus the 1/4 inch from each pass of the chain or 11 3/4 inches.

Yellow Pine Milling 6th Cut

It took everything I possessed to move the 5-inch thick 22-inch wide and 13 feet long board onto the offcut stack.  I will definitely need to have some mechanical advantage in the wings when I try to move this to the stickered drying stack.  I will be moving the boards from the offcut stack about 200 feet to a level and stable location for it to dry.

I continued to cut the remainder of the log into 2 inch thick boards.  I have 3  2 inch thick boards that are almost a full 22-inch width and 2 more that taper down from 20-18 inches.  The top and bottom boards are also about 2 inches thick but are curved on one side.  I’m thinking they would make some nice rustic benches.  Perhaps a waterfall style bench or live edge entry table would also work.  I’ll have to decide where to best use these.

Overall I have 5 boards 13 feet long and 2 inches thick and one 5-inch thick board 22 inches wide of the same length.


Calculating board feet

To calculate board feet, measure the length of your board, and convert to inches ( 13 feet = 156 inches).  Measure the width of the board at its thinnest dimension (22 inches) and multiply these times the number of inches thick (2 Inches) This will provide you with a cubic dimension Length x Width x Depth.  Divide this by 144 (12 Squared).  This will give you the number of square feet of a board 1 inch thick.


Calculating my largest board in board feet I have a 5-inch thick piece 13 feet long and 22 inches wide. 5 x (13 x 12) x 2=17160 square inches.  17160/144= 119.17 board feet in just that one plank.

The widest 2-inch piece yields 47 2/3 board feet. The smallest 2-inch piece yields about 39 board feet.  Overall if I estimate the 2-inch boards at 40 board feet and add the 5-inch piece I have a little over 300 board feet from this first section of pine log.

Pine Log First Section Final Stack

Currently the lumber yard charges between $2.45 and $3.75 for clear yellow pine.  This pine is not clear but it is also wide widths which are difficult to find.  A reasonable price for this lumber is probably close to $3.00/board foot. So, I can expect, once this wood has sufficiently dried, to get around $900 worth of lumber from this section of the tree.

Now that the weather is warming up here in Tennessee,( we had a spell of single digit temperatures) I got out to work on the second half of this log.  An 11 foot section was left but it was attached to the remainder of the tree.  I spent a full day trimming around this log and getting it supported so that it wouldn’t roll on me while I worked.  In the process, I found that the remaining section of the first log was spiked into the ground with a 2 foot branch sticking into the earth.  It was impossible with the weight from the remaining slab and the depth of the submerged branch to move.  I ended up cutting 3 feet off and levering the remainder out of the ground with my Peavy.  I tried to imagine what might be hiding inside the pieces of wood as I trimmed around this trunk.  My chainsaw carving chops will be getting some time served on pine offcuts.

With the second part free of the tree, I gathered my guide, adjusted it to the length of the current Piece and fastened it to the ends of the log.  I adjusted the depth of cut on my jig to clear the angle iron holding the guide and made my first cut.  I opted for a depth of cut of 5 inches which put the chainsaw blade about 3/4 of an inch below the angle iron supports.


While I was away from the log, I sharpened the ripping chain so the first cut of this section was like cutting butter.  Setting up took longer than the actual cut.  I was quite pleased with how easy a sharp chain cuts and am getting a feel for how long a chain can be used before it requires touching up the cutting edges.

Pine Log Section 2 half done

I readjusted the depth of cut for a 2-inch cut and completed 4 boards before I ran out of daylight.  The final cut was difficult so I knew that I was in need of another sharpening.  A quick touch up of the chain took about 30 minutes.  I was ready to complete the log first thing in the morning.  By 10 AM I was done.


Now comes the tedious part.  It is time to move all of the cut wood to a level location where it will be stacked and stickered to air dry.


Granberg File N Joint Review

As I promised in the post I did on Chainsaw Chain Sharpening, I have ordered and received the Granberg Bar-Mount Chain Saw Sharpener, Model# G-106B. Here is a review of the Model G-106B and a walkthrough of using it to sharpen a chain. This Granberg File N Joint review is my opinion from my experience with the jig.
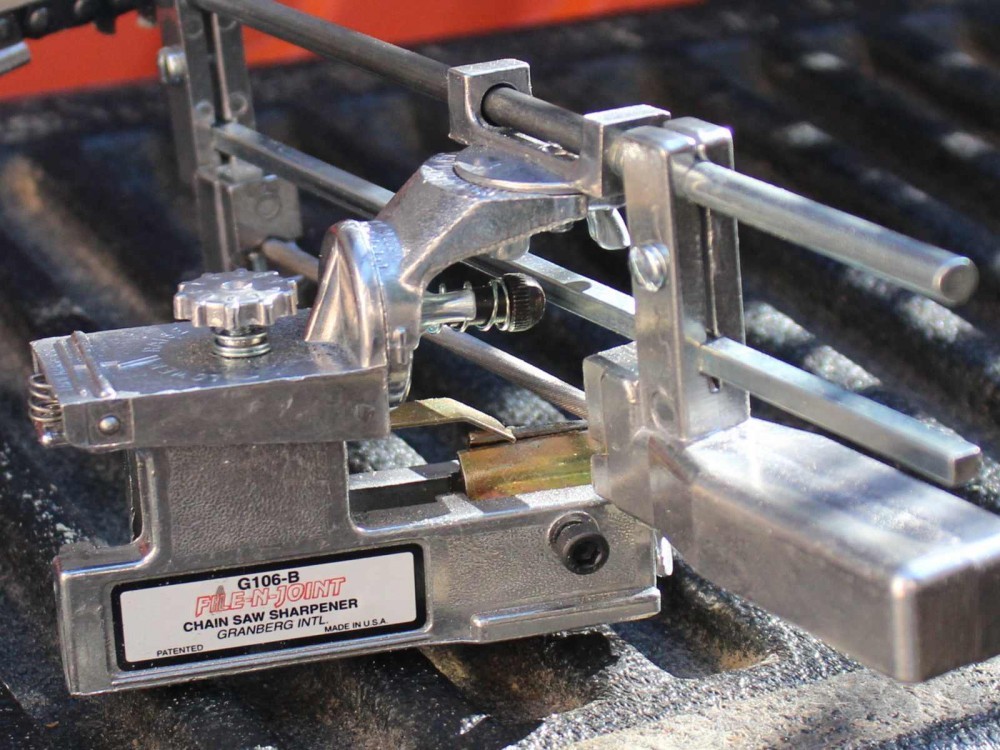
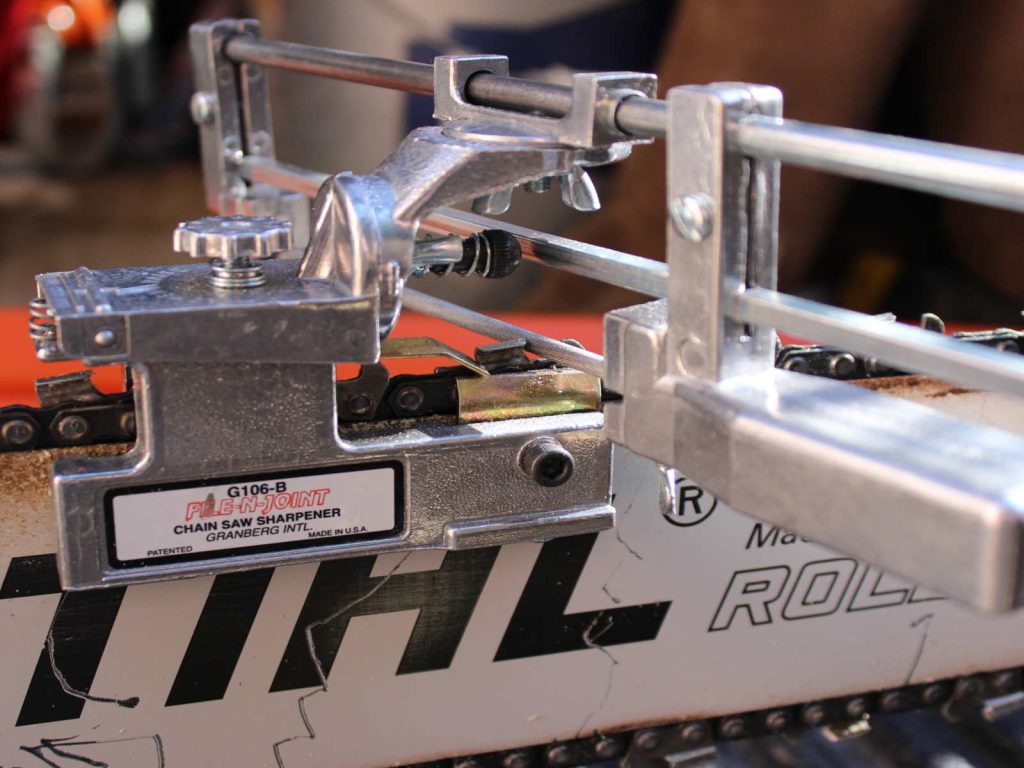
Granberg File N Joint Model G106-B

This jig is used to sharpen a variety of Chainsaw Chains and has adjustments so that it can be used with 3/8″ chain or any other chain as needed.  You just need to insert a new file into the holder if you switch to a different gauge of chain.  Two thumbscrews that hold the file make it easy to swap out or rotate your files.

As the description indicates this jig is designed to be mounted on the bar of your chainsaw.  The chain is sharpened on the saw.  You will need to support the saw somehow.  In my case, I dropped the tailgate on my truck and used a quick-clamp to hold it in place and to keep the chain off the tailgate.  This worked quite well although it was a bit low for a comfortable sharpening session.

Many sharpeners will use a stump vise if they are out in the woods and in need of a quick touch-up to your chain.  Other’s will have multiple chains and put on a backup chain when the first chain is in need of sharpening.  Then the Chainsaw can be mounted in a bench vise and sharpened in your shop where it is more comfortable.

The Granberg G-106B attaches to the bar on the Chainsaw with a Thumbscrew at the back of the jig.  There are two clamps at the front that also clamp onto the chain just above the rivets.  To fasten the jig onto the bar, first you line up the front clamps with the rivets on the chain and tighten by hand the two allen screws.  This sets the height of the jig.  Moving to the back, you line up the base of the jig parallel to the top of the bar and then tighten the back thumbscrew.  Then you loosen the front screws enough to allow the chain to move through the front clamps as it is advanced.
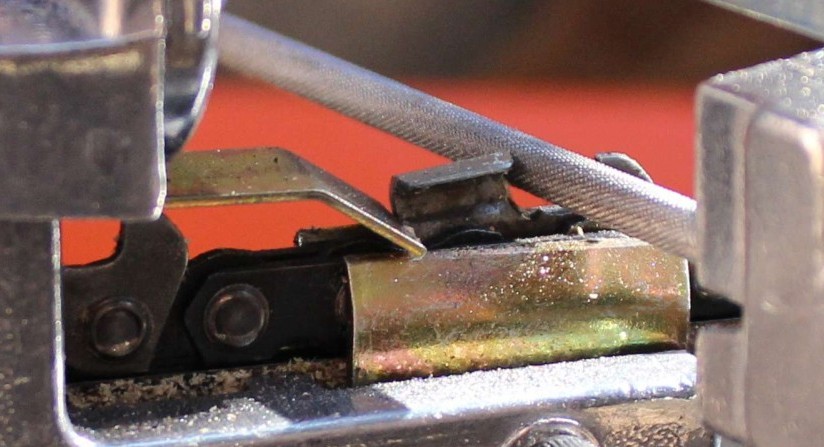
Granberg Model 106-B Chain Clamp placement

This view shows the chain clamps adjusted to hold the chain in place as you sharpen. *Note: the file is aligned incorrectly in this image. The file is set for the opposite tooth angle.

Before I begin to set-up the jig, I will find the shortest tooth.  I use a caliper and measure each tooth until I find the shortest tooth.  I mark this tooth with a red permanent marker.  The ink comes off with a bit of rubbing but once dry will stay in place throughout the sharpening process.

I line up the marked tooth with the Granberg Jig and use this as the Master Link to begin my sharpening.  All of the teeth will be filed to this length.  If the variation is large, or the shortest link is much shorter than the rest, I’ll choose a different short tooth and leave the shortest one unsharpened for this round.

Adjustments

There are 4 adjustments that need to be made to get the jig in the right orientation to begin sharpening.

1. Adjust the sharpening angle
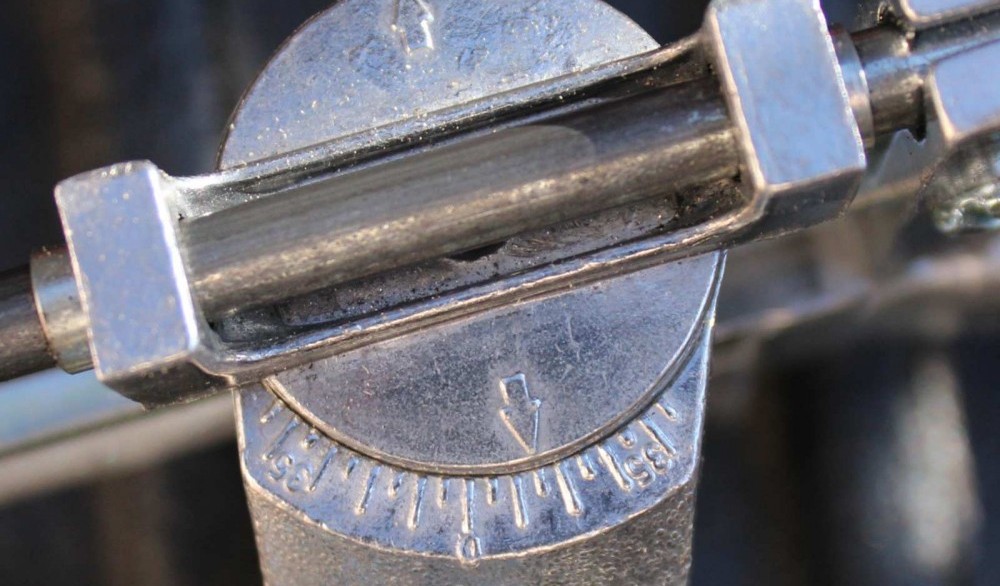
Granberg File N Joint Sharpening Angle Adjustment

This image shows the filing angle gauge. The file is set to 15 degrees for a rip chain.

There is a wingnut under the top of the jig that is loosened to line up an arrow on the top of the jig to the sharpening angle.  There are detents so that the adjustment lands every 5 degrees.  You can swing the angle through 70 degrees, 35 degrees on each side of the zero mark.  Tighten the wingnut when the correct angle is reached.

2. Adjust the tilt
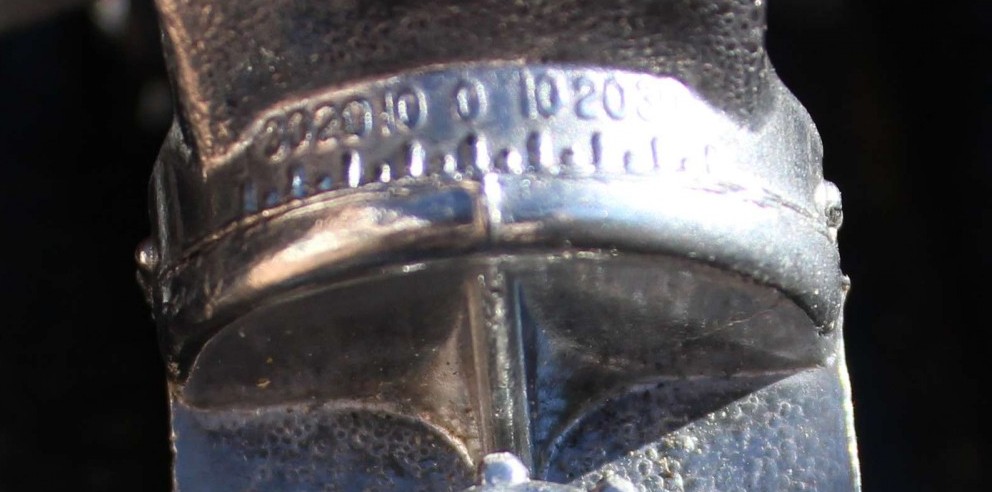
Granberg Model G106-B Tilt Angle Adjustment

This image shows the tilt angle gauge. For the ripping chain that I am sharpening, the angle is set to 0 degrees.

Another wingnut on the front of the jig allows the angle to be adjusted.  In the case of Stihl chains, the angle will be 10 degrees right or left.  Again there are detents set every 5 degrees to ensure that you are setting the angle to the nearest 5 degrees.  The wingnut on the front is very hard to reach and the wingnuts are made from stamped metal.  I expect that I will be swapping these out for a bit more robust wingnut.

3. Adjust the height
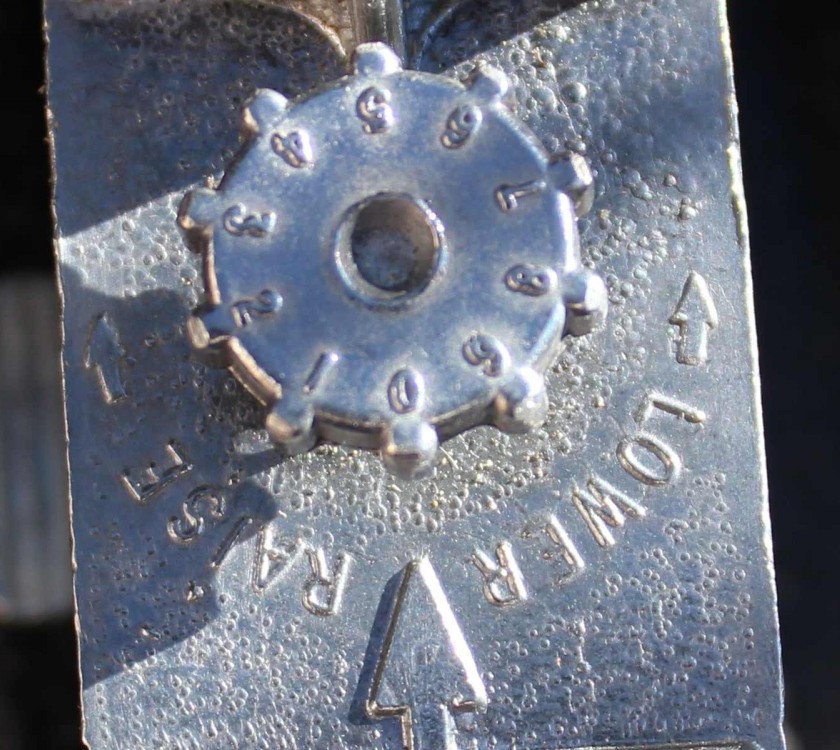
Granberg Model G106-B Height Adjustment

This image shows the file height adjustment knob.

When the angles are correct, set the file into the nearest gullet on the chain. Rotate the dial on the back of the jig to raise or lower the file until about 20% of the file is above the plane of the tooth.  This will allow for the correct angle to be cut on the front of the tooth.

4. Adjust the depth of cut.
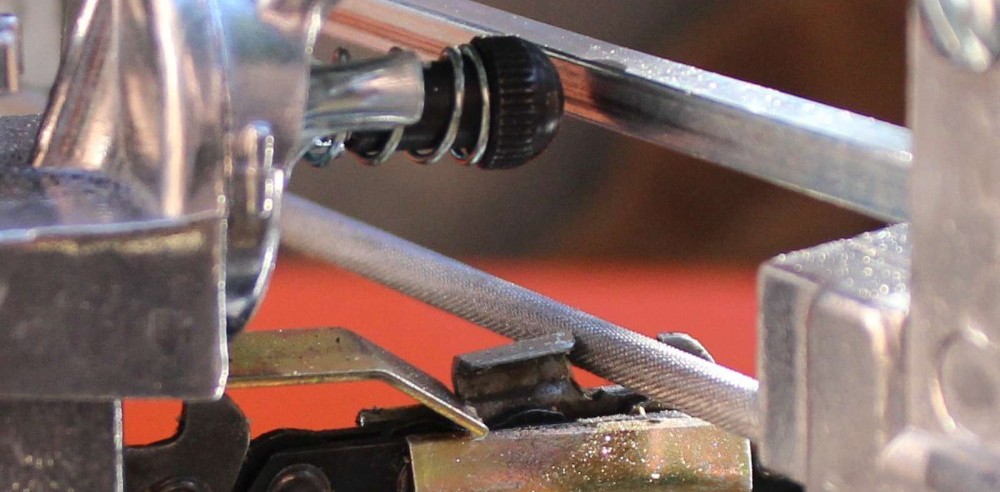
Granberg Model G106-B Depth of Cut Adjustment

This image shows the depth of cut adjustment (the black knob) as well as the registration pawl in place behind the tooth.

There is a small metal pawl that registers the back of the Chain tooth.  You will advance the chain until the pawl drops behind the tooth and then back up the chain until it stops.  This provides a repeatable surface to reference the cut.

Running inside of the tilt angle wingnut there is a round headed bolt.  The crossbeam of the jig will bump up against this bolt.  The depth of cut is set by adjusting this bolt until it pushes the file away from the chain tooth edge.  Then backing the bolt away (in) the desired distance.  I have found 1/4 turn to be about right.

The jig is now ready to sharpen the first tooth.

Sharpening Process
Since the depth of cut is set, I file until the file stops biting the tooth.  This indicates that I have reached the depth of cut.  Some manufacturers recommend filing each tooth the same number of times but if there is tooth length variation filing to the depth stop will create a uniform tooth length.

To begin, I set the chain brake on the Chainsaw.  I file the marked master tooth.  Then release the chain brake and advance the chain until the reference pawl drops behind the next tooth with the same orientation.  On a full complement chain, this will be the second cutting tooth.

I back up the chain until it is tight against the reference pawl and reset the chain brake.  Then I file the next tooth.

Repeat this process until the marked tooth is again under the jig. You have now sharpened 1/2 of the chain.

Adjust the angle to the other side of the chain and reset the tilt angle if not zero.  Unlock the chain brake and advance the chain one tooth.  Look closely at the depth setting and the height of the file to verify that your cut will be the same as the previous setting and you are off and running with the other side.

Repeat the filing and advancing until you have completed the chain.

What I like about the Granberg File N Joint

Pros

  • Set-up of the jig is pretty fast.
  • The jig is able to adjust to different angles and pitches of Chainsaw Chain.
  • Once set the filing is quite efficient and simple.
  • The depth setting makes your chain uniform and reduces vibration during use of the saw.
  • Fast and accurate.
  • The detents make it easy to set repeatable angles.

What I don’t  like about the Granberg File N Joint

Cons

  • The jig itself feels cheap
  • The wingnuts are pressed metal and don’t feel as though they will hold up over time they are also difficult to reach and operate.
  • The handle is not long enough for a comfortable grip forcing you to use gloves for comfort.
  • Adjusting for the Chain Depth gauges is difficult and didn’t yield good results for me.  I had to use another depth gauge to set the depth of cut (rakers) on the chain.  This requires another jig but is easy and repeatable without the Granberg File N Joint so wasn’t really a problem.

Overall Rating- Granberg File N Joint Model G106-B

For overall repeatability of filing angle and ease of use, I would give this jig a 5 Star Rating

For fit and finish, I can only go with a 3 star Rating.

Price is well worth the investment.  For around $50 this is the best cost/benefit device that I could find.

I do recommend it for a quick manual sharpener that overcomes the most frequent problems of not getting a uniform edge on your Chainsaw Chains.
Granberg Model G106-B


As a long-time Woodworker, I've built a variety of large and small projects.  I've learned to use the tools available to me to get the job done.
I'm currently outfitting my new shop.  I need to work with wood or I'll go crazy.

Follow along on my journey to rebuild my woodworking shop and start a business from the ground up.

Trying My Hand at Carving

Trying My Hand at Carving

Christmas Shopping

Every year for as long as I can remember, I would pop down to my shop in the basement and start making Christmas Presents. I have made a variety of stuff. I have made a bunch of salad forks and cooking spatulas.  My latest design was a single fork with a spatula, basically a salad serving set.  I upgraded the basic design by turning a finial on the handle and making the handle round.  The Spatula and Fork were made from Black Walnut that I received in payment for making a waterbed frame for a friend in Pennsylvania. I have 5, 2 inch thick boards roughly 18 inches wide and 8 feet long left of this wood.  Perhaps you will see a project made from the remaining wood.

Turned Salad Serving Tools

One year a friend and I made a road trip up to the Adirondacks to pick up a bunch of pine and cherry wood (harvested on his mom’s property and air dried in a barn for several years) with this wood and some I had from another project, we created a dozen laminated clipboards, 6 cutting boards a cherry bedside stand and a large organizer we called the beast that was purpose-built for his dad, we also made several hand mirrors and 2 dressing table mirrors.  We each had large families and lots of time to kill.  Well, not lots.  We drove to Lake Placid on October 6th and the finishes on the projects were just barely dry on Christmas.

That was back in the day when my shop was set up and in the basement.  Now, the tools are in storage and I need to find a jewel in the rough to give my new significant other for our first Christmas together.

Found Wood

I was able to locate a couple of pieces of Cherry out in the woods that were slated for the burn pile.  One piece was 8 inches in diameter and 3 feet long, fairly straight with bark on it that was still tight.  This indicated to me that the piece hadn’t been sitting in the woods for a long time rotting.

I peeled back the bark and did find a few larvae in the bark.  There didn’t appear to be damage to the underlying wood so I stripped off the bark and contemplated a Christmas Project. My special lady is very fond of Pelicans.  I thought perhaps I could find one in this piece of wood.

Roughing Out

I started with a small chainsaw roughing out the general shape and defining the wings, tail, and bill.  Then I started hogging out the fine details with a 36 grit sanding disc in a 4-inch angle grinder.  For this part of the process, I covered myself with dust so, after a few minutes of this, I grabbed a dust mask and ear protection.  I still spent hours clearing out my nose at the end of the day.

Roughed Out Pelican Carving

I downloaded about 10 images of Pelicans in various poses from the internet, I estimated that this would help me to get the proportions right.

Refining

I used a variety of tools to refine the shape.  I tried a Dremel tool with a burr cutter but the bit was too small and the high speed of the cutter and softness of the wood caused the wood to burn instead of removing it efficiently.  I ended up using a rasp bit attached to a reciprocating tool to get the fine detail I needed in several places.

I opted to hand carve the feet with a chisel and mallet.  I wish that I had a power chisel but I had to make do with what I had on hand.  I was able to use the reciprocating tool with a plunge blade installed to carve out between the feet.  I left a considerable amount of wood around the feet.  I didn’t want to take too much wood out of the support for the bird but I wanted to give it some semblance of a leg.  Sadly, the legs look more like those of an Owl than they do a Pelican.  Everything has its compromises.

Repair

I worked on the shape over a period of 3 weeks, as I removed and refined the shape, I noticed a crack developing.  It ran across the forehead of the carving and reappeared on the back of the neck.  A second fault began to appear in the center of the back. I kept an eye on this as it developed and after about a week I decided that I needed to do something before the crack split the head in two.  What was happening was that the heart crack in the wood was beginning to split as the wood dried. This needed to be filled to level the crack and to keep the carving from splitting more as the wood dried. Epoxy was the only solution.   Filling the crack with Epoxy stabilizes the crack and fills it to create a smooth surface.

Heart Crack Developing

Heart crack developing in the center of the back of the carving. This image shows an early image of the crack just beginning to form.

I happened to have a small can of West System 105 Epoxy Resin and some 205 hardener.  I purchased this to repair a few window sills on the house that I just sold up North.  If you have never used this stuff, mixed with a bit of sawdust until it is a paste, you can fill just about anything.  Give it 3-4 hours to set up and you can file it with a rasp.  Leave it until morning (8 hours) and it is hard as a rock. The one drawback is that it is temperature sensitive.  Below 60 degrees it has a hard time setting.  As the temperature gets warmer, the cure time is reduced.  So, on a hot summer day, the open time (time it can be worked) is considerably reduced. When this is fully cured it is sandable but smelly and the dust is somewhat toxic. It can be a bit expensive but has a long shelf life unmixed and is perfect for filling things and stabilizing rotting wood. Once cured it is highly water resistant.  I learned about this product when I was building canoes.  The inside and outside of the boat is coated in 3 coats of West System Epoxy over a fiberglass mat creating a smooth waterproof surface.

In this case, I used the West System Epoxy to fill and stabilize the heart crack.  I mixed a small batch, added sawdust that I reclaimed from the oscillating sander dust collector, and pressed the fill into the crack as deep as I could get it.  I was only able to penetrate half an inch but the runny nature of the Epoxy settled down into the cracks before it cured.  I moved the carving inside the house once the Epoxy was in place to allow it a warm place to cure.  A second coat on the following day filled in where the Epoxy had settled into the cracks. When sanded smooth it does show but does an amazing job of filling and preventing the crack from opening up more as the wood dries.

Filled Heart Crack

Heart crack after filling and sanding. The final finish has been applied to the Pelican. You can see how much additional cracking has occurred since the first image was taken.

Final Sanding and Finishing

After I had refined the shape to the best of my ability, I went over the entire carving with 100 grit sandpaper in an oscillating sander, then moistened the entire carving to raise the grain. A second sanding with 100 grit sandpaper smoothed the raised grain and a final hand sanding with 220 grit after a quick rubdown with a tack cloth smoothed the surface to my satisfaction.

A second pass with the tack cloth removed all of the sanding dust to prepare for applying the finish. I chose a high gloss Spar Varnish for the final protective finish. I had to move indoors for this process as Spar varnish needs to be warmer than 60 degrees to dry.  I sanded lightly between coats and went over the entire carving with the tack cloth each time I applied.  3 coats were sufficient for a nice solid bright finish.

Result

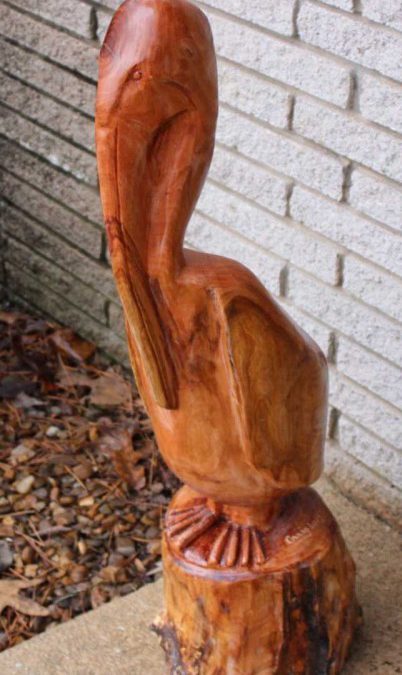
Finished Pelican Carving

Here you can see the finished product.  As this is carved from Black Cherry, the reddish hue of the grain will darken to a deep red as it is exposed to the air and UV light from the sun.  It will only get more beautiful as time goes on.


As a long-time Woodworker, I've built a variety of large and small projects.  I've learned to use the tools available to me to get the job done.

I'm currently outfitting my new shop.  I need to work with wood or I'll go crazy.

Follow along on my journey to rebuild my woodworking shop and start a business from the ground up.

Stay on Top with Woodworking Warrior

Join the mailing list to receive the latest news and updates from us!

You have Successfully Subscribed!

Pin It on Pinterest