In my last post, I talked about putting up the building. My next task was to get electric power to the building and to wire the inside.
Electrical Permits Start the Process
To start this process, the first thing that I needed to do was get electrical permits. Our local utility has an office that accepts permit applications during a small window of time (7:30-9 AM). I braved the commuter traffic and paid my fee with the local utility. I also set up an appointment with a site representative to come out and discuss where we’re going to put the line that provides power to the shop. After going around and around several times we finally settled on a second meter on the house that would provide separate electrical service to the shop.
Supply Line Design
The power to the shop would go through a meter mounted on the house through electrical conduit for about 75 ft mounted above ground on the wall of the house. Then the conduit would go underground across the yard for another 75 ft. and emerge on the corner of the shop. I was a bit surprised that the inspector said that he needed to have ground wires run at the house and at the shop it’s my understanding that most municipalities want a single ground and then a ground wire run out to the shop. Since this gentleman was going to be doing the inspection I did it to his specification.
To ensure that we had all the capacity we needed I settled on a 200-amp service. This way we can run several 220-volt circuits as well as several 120-volt circuits inside the shop and have plugs where we need them and excess capacity. I really wanted to run copper wire from the electrical box across the hundred and fifty feet to the shop but it’s just not available. I had to settle for 4/0 aluminum cable. The conduit was 4-inch electrical conduit suitable for above-ground and underground installation.
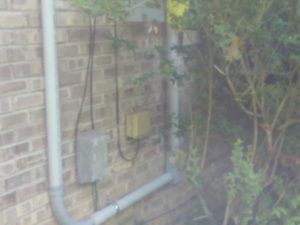 I started by installing the meter box on the side of the house adjacent to the currently installed meter. I was a bit surprised when the meter box was considerably shorter than the one next to it (more on this later).
My plan was to run the conduit from the meter box down the wall about two feet across the wall, another four feet up to the top of the wall and around the corner. Then running across the garage door, around another corner and then down into the ground. Once I was in the ground I’d run it through a trench along the rest of the side of the building and out across the lawn until I got to the shop. This would avoid the garage opening and get me past the Well and all of the water lines that came into the house next to the Well.
Installing the Conduit
I laid out all the conduit and mounted it to the wall. To mount it I use lead anchors that take a quarter inch lag bolt. I ran the lag bolt through a conduit clamp. Each anchor had to have a quarter-inch hole drilled in the brick and then the anchor was installed and the conduit clamp installed with a washer into the anchor. At this point I didn’t install the wiring I just wanted to have all of the conduit sized, mounted and ready to receive the wire.
When I had all of the conduit in place around the garage door and across the side of the house it was time to go get a ditch digger. I stopped by my local United Rental and had them supply me with a trenching tool. This also goes by the name of Ditch Witch. For those of you that are not familiar with this tool, it’s a large rotary disc powered by a gasoline engine. It cuts a 2 ft deep channel in the ground about 6 inches wide and then has an auger on the side that piles all the dirt removed next to the hole.
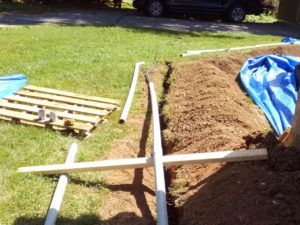
The ditch that I had to run crossed about 45 ft of lawn then turned 45 degrees and ran along the house for about another 35 ft. I started with a shovel, digging two 2 ft deep holes at either end of the run. I installed conduit and put on the 90-degree turn that would connect to the long section of the conduit in the trench. For this layout, I laid down the long straight pieces of conduit and identified where exactly I needed to make the 45-degree turn. Then I fired up the trencher and started next to the shop cutting a trench across the main section of lawn. I overshot the trench at both sides of the 45-degree turn to try and keep the dirt out of the trench where I was changing directions.
I reoriented the trencher to move across the side of the house and was moving very well for about 15 feet. Then I started to hit construction debris. It appears that the installer of the building had just tossed a bunch of bricks and rock around the foundation of the house and then covered it with dirt. It took me about 45 minutes to cut across the lawn and another three and a half hours to cut the edge along the house.
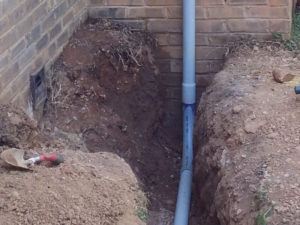
When I finally got close to the end I had to reverse the direction of the trencher because I was too close to the wall. About two feet after I started cutting back towards the main trench a fountain of water erupted from my trench. It appears that the waterline feeding the house was not where it was expected to be. If I had known that the water line was there, I would have continued my above ground conduit along the side of the house as well. Instead, I got to spend a day and a half repairing the waterline.
 My next task was to lay out all the conduit inside the trench and prepare it for installing the wire. The water line turned out to be very problematic as I needed to run the wire through the conduit around the house and then connect the conduit underneath the waterline. This meant that I couldn’t install all the wire and all the conduit and just lay it into the trench. It took considerably longer to work around the waterline.
To complicate matters it started to rain. Not just a little bit of rain here and there but torrential downpours. Each day for a week we received about 3 in of rain a day. My trenching job was on hold while we waited for the rain to stop. I covered the trench with several tarps and anchored them down to keep them from blowing off the trench and to keep the water out of the trench. Did I mention that I’m working in clay soil. Every time I stepped on the dirt my feet gained 2 lb of sticky slimy clay.
Interior Shop Wiring
While it was raining I turn my attention to the inside of the shop. I had decided to use 5 circuits for the 120 volt supply lines. The first circuit supplied the exhaust fan and the lighting for the shop. This circuit had 3 wall switches for each of the devices. The remaining four circuits provided power to a number of plugs along the walls of the shop. I also added 3-30 amp 220-Volt circuits for various shop equipment and one 50 amp 220-Volt circuit for a plasma cutter that we will have attached to our CNC unit to make decorative metal.
The five 120 volt circuits are all wired with 12 gauge wire. This is so that we can connect 20 amp duplex sockets and not worry about overloading the circuits. Each one of these circuits has a ground fault circuit interrupter plug first in line. By putting the GFCI first it protects the entire circuit. The shop is classified as a garage so GFCI circuits are required by code.
Each of the three 30 amp 220-volt circuits are wired with 10 gauge wire. I have the band saw connected to the first 220-volt circuit. The second 220-volt circuit will be for the air compressor. An air compressor is required for the plasma cutter to provide shield gas. The third 220-volt circuit will be for a Planer or Jointer that will be purchased in the future.
The 50 amp 220-volt circuit is dedicated to the plasma cutter. This is wired with 6-gauge wire. It will be dedicated specifically to the plasma. If I find that I need to weld I will probably use gas. I have some experience welding with oxy-acetylene and it’s my preferred method. If we do end up getting an arc welder, I can plug this into the circuit for the band saw and weld out in front of the shop. The flooring in the shop is not fireproof so welding needs to be done outside.
It took several days for the rain to stop and while that was happening I was able to get all of the wiring in place and prepare the electrical panel inside the shop.
Electrical Inspections
Finally, the rain stopped and I was able to run the wire from the meter box on the side of the house through all the conduit and out to the shop. I took this opportunity to glue up all the conduit and then I called the inspector to come out and bless my trench. Apparently, they need to verify the specifications of the trench to make sure that it was two feet deep. Once he gave me the okay I was able to fill in the trench.
With the wiring installed I was able to complete the wiring to the electrical panel and install the circuit breakers and all the duplex outlets and 220-volt outlets. Then I had to call the inspector back and get the final inspection done on the shop.
The inspection was somewhat of a letdown as he noticed that I had installed a 100 amp meter box on the side of the house. So, I had to tear the 100 amp meter box off the wall and install a 200-amp meter box. Fortunately, the additional length of the 200-amp box provided me with sufficient wire lengths to make the connections. This really was a minor inconvenience. The inspector was doing an inspection on a house just up the road from me so the next day he stopped on his way out to the other inspection and gave me a green light.
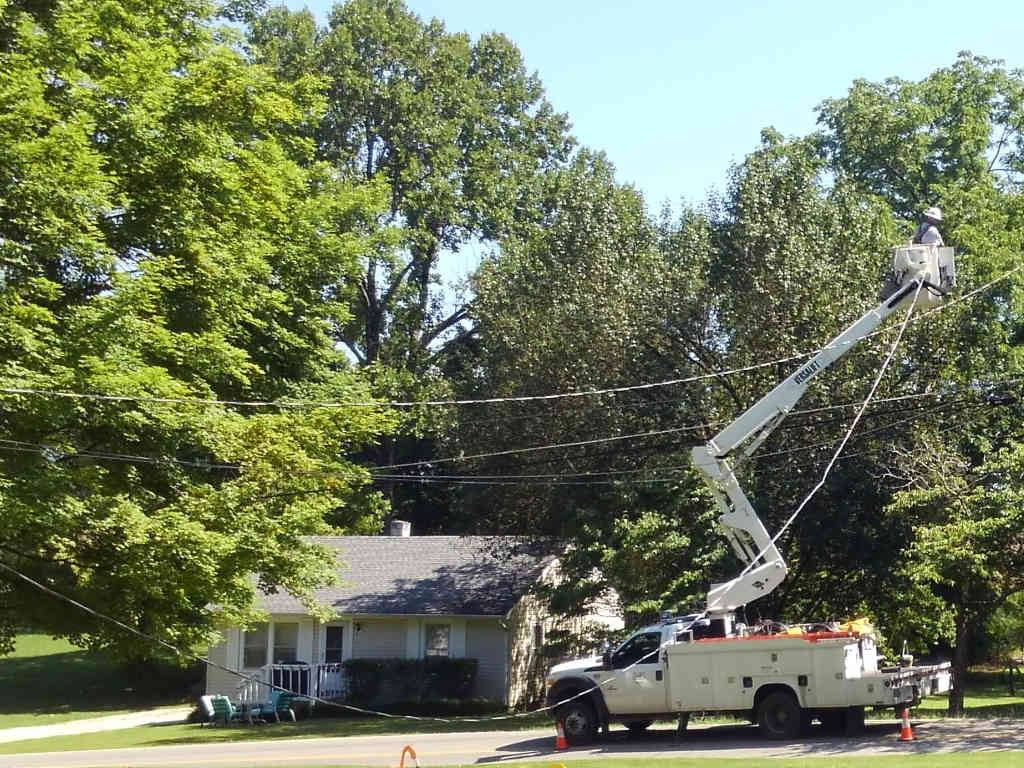
The final inspection was the trigger to have the Utility company come out and install the wiring from the pole across the street to the meter box. they arrived two days later with a cherry picker and enough wire to make the final connection. It took them about a half an hour to install the connection from the top of my riser across the street to their Transformer. Very quick and very professional.
I now had power to the shop.
I went out to the shop and flipped on the main breaker, plugged in a light to make sure everything was working and found …nothing. I pondered a bit on what might be wrong and then I realized the ground fault circuit interrupters needed to be reset the first time power was applied. Once I reset the GFCI plugs everything came on and was fully operational.
Yeehaw! I have power!
The next phase of this project is to get all of my tools out of the storage unit and into operation. Follow along as I unpack and calibrate my radial arm saw, my table saw, my lathe ( which doesn’t need calibration), Dust collection, etc. and in general get my shop operating and ready-to-use.