
We were invited to spend Thanksgiving sitting around a campfire. There wasn’t enough seating for all of us. I happened to have some Yellow Pine that I slabbed last year so I thought some nice live edge wood benches would be a nice addition to the party.
When this idea germinated there were only a few days before Thanksgiving but I was up to the task.
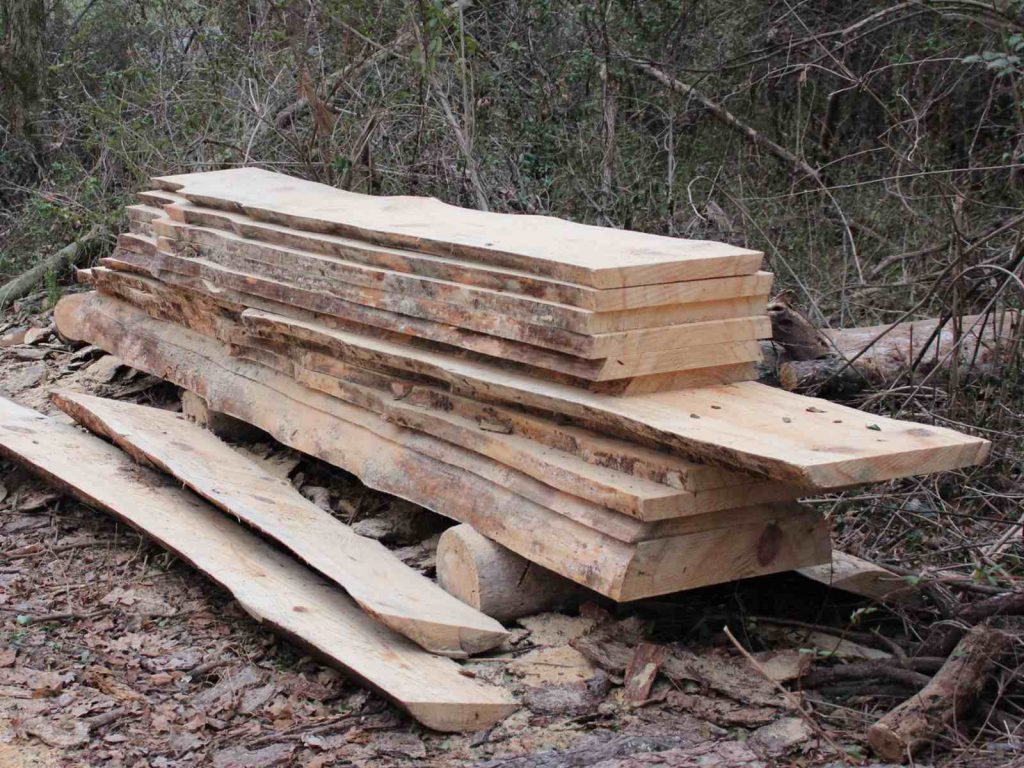
I had an 11-foot board that was about 17 inches wide and 2 inches thick. This would do nicely.
Sizing the Live Edge Wood Benches
I wanted the benches to be 19 to 20 inches tall so I determined that 18 inches would be the optimum length of the upright legs. I would create a mortise in the top for the legs to fit into and drill through the top for Lag Bolts. A crosspiece between the legs would stabilize the entire assembly.
We wanted to have room for 2 people to comfortably sit on each of the benches so 32 inches seemed to be the right length for the benches. I cut the first one to 32 inches but when I got to the end of the board, there were only 28 inches left. One bench 32 inches long and the other 28. These seemed to be adequate for what I was trying to do.
Cutting the Live Edge Wood Benches to Size
The big problem when working with live edge boards is that there is no square edge to reference. Before you start to cut, you need to create a reference line to work from. Snapping a chalk line down the middle of the board solves this problem. It provides a reference for you to complete your measurements and establishes a benchmark. It doesn’t really matter where on the board the chalk line happens, but it needs to be there to provide a reference for all of the other measurements.
I snapped a chalk line along one edge of the board. This gives me a good bearing surface for my Carpenter’s Square. I used this reference to mark off square lines for the cut.
I cut each marked length and then measure for the next. This provides additional accuracy. If I measure all the distances at one time I need to worry about the thickness of the saw blade and the dimension may wander by 3/16″. Measure twice, cut once to maintain accurate dimensions.
When I started cutting the pieces to size, my Circular Saw decided to quit. It was a Craftsman Contractor Grade Circular Saw that I bought when I was working in construction back in the ’80s. I think I’ve gotten my money’s worth out of that saw. I suspect, from the failure noise that it created as it quit that I may be able to just replace the brushes on it and get some more life out of it. That is if I haven’t damaged the commutator when the brushes reached the end of their life.
I headed over to Lowes and picked up a replacement. I bought a Porter Cable 7 1/4″ Circular Saw for right around $50. I’ve had pretty good luck with the Porter Cable equipment so this is a brand that I’m comfortable with. After completing the cuts with this new saw, I’m quite impressed with the quality of the saw. I am amazed at the power that it provides in the lightweight package.
The end result? I ended up with 4 precisely cut 18-inch legs, 1-32 inch top piece and a 28 inch second top. I still needed to have a crosspiece for each bench. I turned to my pile of cast-offs from dismantling some pallets. One piece of poplar and a nice piece of Red Oak stepped up to fill this need.
Cutting Dados for the Legs
I needed a dado cut for each leg. By cutting a recess 3/4 inch deep the legs are captured and stabilized so that they will never move. This also creates a stronger connection to the legs by providing a gluing surface. Since the Yellow Pine is just air dried, it may have a tendency to crown in the future. Capturing it in a groove will minimize the amount of movement that will occur.
Instead of capturing the legs in a mortise with a recess the Dado goes all the way across the bottom of the bench top. This doesn’t look nearly as good but I was limited by time so this was the most efficient way to proceed.
To make sure that the Dados were straight I created a guide for the new saw. I cut 5 inches off the factory edge of a piece of 1/4 inch plywood then glued it to the top of a 10-inch piece. I used the factory edge to guide the saw on one side cutting a line using the saw guide. Then I repeated the process on the other side with the other side of the guide on the saw. Now I have a guide customized to the saw that allows me to line up the guide to the cut line and cut a straight line every time. I could have spent lots of money purchasing a track saw but this homemade guide works just as well in most cases.
I used the Circular Saw to make multiple cuts inside 2 lines set 2 inches apart. The outside line was 4 inches from the end of the board. I knocked out the waste and cleaned up the bottom of the notch with a chisel.
Through Mortices and Tenons for the Legs
With the bottom of the top ready to accept the legs, I turned my attention to the mortices in the legs. One crosspiece with tenons and a through mortice in each leg.
Tenons
When I cut tenons, I will typically mark the layout with a knife. This keeps the edge of the grain from tearing out if I use a power saw to cut them. If I hand cut them with the Japanese Ryoba saw that I have, I make a second score line that creates a channel on the waste side of the cut to guide the saw.
In this case, I set up the Radial Arm Saw to remove 1/4 inch of material from the sides and then cut about a 1/2 inch from the ends of the tenon. With a sharp chisel, I then pared down the edges of the material to the scored lines. Final dimensions of the tenons were 3/4″ by 3″.
Mortices
The important thing to understand when cutting through mortices is that you need to cut from both sides. If you only cut your mortice from one side the back side will chip out. So, the layout needs to be precise.
I laid out the mortice 10 inches up from the base of the legs and centered on the width. I traced around the tenon that I cut for that end. and located the center of the layout by connecting the corners of the layout with a pencil line. Then I transferred the lines using a framing square to the opposite side.
To make sure that all of my measurements were accurate, I drilled a 1/16″ hole through the center of the leg at the layout center. It came through the other side with minimal tear out and was exactly where I expected. I traced the tenon on the outside of the leg and cut the outside markings with a layout knife. This gives a precise location for the chisel and keeps the grain from tearing out as I chop the mortise.
I removed most of the wood for the mortise with a 5/8 inch Forstner Bit chucked into my hand drill. I cut a bit past the halfway point from the outside and then completed drilling from the other side of the leg. I overlapped the holes so that most of the wood was removed and the final size and shape of the mortise could be refined with chisels.
Putting it all together needed a bit of refinement as I had to fit the tenon multiple times to refine the edges but the end result was a nice tight fit and sharp edges to the mortices.

Final Assembly of the Live Edge Wood Benches
As a test fit, I put the mortise and tenons together and then inserted the top of the legs into the dado slots in the top of the bench. Everything lined up nicely. I laid out and drilled 3 7/8″ holes 1 inch deep over each leg then drilled through with a 1/4 inch drill bit. These will accept 1/4 inch lag bolts. I wrapped a piece of tape around each bit (7/8″ Forstner bit, 1/4 inch standard bit) to give me a reference for the depth of the recess. I tried to put these on my drill press but there wasn’t enough space to reach the center of the top. A hand drill was fine for this application.
I disassembled everything and added glue( Titebond II) to the dados and the mortise and tenon joints. Then I screwed in lag bolts to hold the top tightly to the legs. Each of these was covered by a piece of dowel and sanded flush when the glue was dry.
I wiped up any glue that squeezed out of the mortise and tenons and cleaned up all the drips to make sure the benches looked presentable.
Everything got a light sanding. I wanted the benches to look rustic and didn’t want to remove all of the milling marks from the top and sides. I didn’t want anyone to get a splinter in their backside though so a light sanding with my random orbit sander and 100 grit sandpaper was all I needed to do.
Over the years I have found that pine responds well to a wet wipe down. This raises the grain in the pine and keeps the grain from sticking up as the finish is applied. So, I wiped the entire bench with water and let it dry for about an hour then resanded.
The finish on these benches was Teak Oil. They may be outside at some point and the Teak Oil has UV protectant. It is also a bit more water resistant than the Tung Oil I use for an interior finish.
3 coats of Teak Oil with a day between each to dry finished the project. I lightly hand sanded with 400 grit paper between each coat and removed the sanding dust with a tack cloth. This provided a smooth finish that allowed the grain and milling marks to be prominently displayed but felt like a fine smooth finish.
I was pretty pleased with the result.

Wow, first of all let me say what a great job you did with the benches. I love the rustic nature of the finished product. Yellow Pine is a beautiful wood too.
I have to admit my carpentry skills are somewhat lacking so it would take me a whole lot longer to build what you did. And even then it might never look nearly as good.
Have you ever thought of making furniture like this to sell or even running courses to show others how to do it?
Mark
I expect that I will have excess inventory in the next few months. Now that the stack of pine is to the point where I can do rustic furniture of this sort it will start to be used.
I have a couple of more projects in the works that I used some of the Live Oak from South Carolina. Check back in a few days to see those results.
Hello Craig,
Wow thank you for sharing your experience of creating this live edge wood bench! I like that you started by telling the story and noticing that there was a problem that needed to be solved. A quick and resourceful solution was formulated due to previous experience in wood working knowledge and application.
It looks like you figured out your process of construction pretty quickly after sizing up your resource inventory. I like that you walked us through step by step of the right way to construct the joints and where to start.
I think it would be a great feature to have a series of walkthrough videos that show the process of construction. If you were not able to capture it this time, then maybe the next time you can film some of it and walk us through what to look for and the right way to cut it out. If you create consistent video content, I guarantee there would be people interested in watching it and it would keep people on your site longer as well. This reduces the bounce rate tremendously.
Thank you for sharing your experience and the bench looks amazing!
Thanks for commenting Daniel,
I have been considering creating some video walk throughs of my projects. Since I’m still working in a difficult location this is quite hard to do. Once I have nailed down a permanent shop and can control the lighting and the background noise I’ll certainly consider this.
Hello. What a great job you did. Seeing the photo remind me of the seat still really used in most countries in Africa. You will not believe but a carpenter or rather future Carpenter has to be trained 3 to 5 months to make those seats. Apart from the lack of materials, some like myself are just not clever enough with their hands. I almost could not believe how the end result looks so great and the ingenuity you come up with. Allow me to share your post with some friends who want to start building natural hand made wooden seats. Than you
Thanks Biova,
These sort of benches are used throughout the world. Here in the US, there is a revival of rustic materials being used in high end housing.
I’m sure if you were dedicated enough these sort of benches would not be beyond your capabilities.
I was quite pleased with the end result.