In the fall of 2017, I created a homemade Alaskan Sawmill. You can read a little bit about it on the page for the Alaskan Sawmill Project. I was able to slab a cherry tree and two large chunks of the yellow pine tree. I also worked on some of the live oak down in Hilton Head.

I made the original Alaskan sawmill jig from common materials that I bought at one of the big box stores. It was made from softwood. With all the cutting that I was doing the pine didn’t hold up very well. Eventually, the bolts that I was using to hold everything together caused the Pine to split. The bolts also worked their way into the pine causing the clamp to run out of thread to hold the clamps tight onto the saw blade. This caused the clamps to slip and my chain impacted the bolts and dulled yet another chain.
I have been sharpening the chains and this time I was still able to sharpen the chain. It wasn’t as heavily damaged as the first time that I had the problem. I did have to adjust the depth gauges as I have taken off quite a bit of metal with the repeated sharpenings of the chain. I’ll be continuing my work on the Live Oak down in Hilton Head next week. With any luck, the chain will perform well. As a backup, I have purchased a brand-new ripping chain. I’m currently using the 30 RP from Woodland Pro. I have found that the ripping chain works much better than the crosscut chains for this work.
I have noticed that there are some problems with the jig the way I put it together. Of course, the first problem is that I used softwood. So for my new jig, and since I was cutting Live Oak anyway, I grabbed a little bit of Live Oak and put it on the radial arm saw and cut out new blanks for my new jig.
A Fresh Jig to Correct the Problems
The first problem that I ran into was that the softwood, the pine, wasn’t sufficiently strong to keep from bending when I tightened the clamps. The other problem that I ran into was that over time the washers that I used under the head and bottom nuts began to work their way into the pine. The 3/8 inch bolts that I used were 4 inches long and were only threaded for part of the way. As the pine compressed I ran out of thread to efficiently tighten the clamps.
Eventually, the loose clamps allowed them to slip, this chewed up the center section that held the clamp off of the chain. It made the clamps unusable.
The other problem that I had was that each time I went to tighten the clamps I had to loosen the board at the top put a wrench on the top of the Bolt so that I could tighten the lower nuts. This got to be a major pain in the backside. When I originally designed it the jig was set up for a 2-inch thick cut (8/4). It would be very nice if I could cut 4/4Thick boards instead of the full 8/4. I can still add spacers to bring it up to a larger thickness if I’d like.
I had a piece of 3 foot long Live Oak that I brought back to create my new jig. I had to do some judicious cutting to get stock that was thick enough and wide enough to use on my new jig ( the piece is one of the outside cuts so it wasn’t even close to flat or straight). Eventually, I was able to create two pieces that are 2 inches wide, 12 inches long and 1 1/8 inch thick. I also cut two pieces that are 12 inches and 2 inches wide but are an inch and 1/4 thick. I use these for the bottom pieces, the top pieces are the 1 1/8 inch thick pieces.
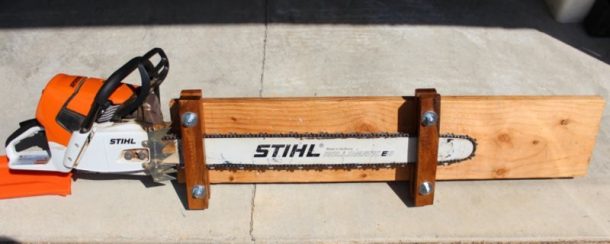
My chainsaw blade is 3 inches wide at the base and 2 1/2 inch wide at the end. So I chose a 2 x 2 section in the center of each clamp to be full width. I relieved the ends, 5 inches on each end, by 1/8 inch so that the chain will clear the clamp.
In the center of the full-width section, I cut a half-inch hole and on the inside, I chopped out a hexagonal space 1/2 inch deep to house the nut for the threaded rod. At the ends of each top piece, I drilled a 3/8″ hole that was positioned in the center and 2 inches in from each end. I placed the bolt into the hole and marked out the top of the bolts. I then recessed the top of the bolts so that they fit into these recesses flush with the surface.
Moving on to the bottom piece, I clamped the two pieces together and continued the 3/8 inch hole through the bottom pieces on either end of the piece.
Finally, I glued the half-inch nut into the recess on the bottom side of the top piece for each clamp.

The Resulting Jig
I recessed the bolts that hold the clamps together into a hexagonal recess to keep them from turning. This allows me to only need one wrench to tighten the nuts that hold the clamps together. At this point, I haven’t glued the bolts in. I’ll consider this if it becomes an issue with play as the jig is used. Since I have chosen Live Oak as the material for the clamps, I don’t expect that this will be an issue.

I also glued some rubber from a pair of heavy-duty rubber gloves onto the inside of the jig where it contacts the saw blade. This should cushion the blade a bit and provide additional friction to keep the clamps from sliding. While the clamping pressure seems to be sufficient, I will only know that it is sufficient after a few passes through some trees.
You will notice that there are two nuts on the bottom of the clamping bolts. The second jam nut provides extra security so that the clamps won’t slip.
Here you can see the back clamp in place. I have centered the clamp in the middle of the saw blade.

The next image shows the front clamp in place. Notice that there is a much thinner blade at the front end of the blade. This was the determining factor for the size of the clamping pads.

I have also made a series of spacers that will go between the top of the clamp and the guide board if I wish to cut thicker slices from the trees that I am milling. With the current dimensions and no spacers, I expect to get full 4/4 boards. I will complete the Live Oak with 8/4 thickness so I will need to add a 1-inch spacer between the clamp and the guide board.
I have cut spacers that are 9 inches long and 1 1/2 to 2″ wide ( I was cutting these from a 2X4 so some are 2 inches wide and some I just got lazy and used the thickness of 1 1/2 inches). The thickness of these spacers vary. I have 1 1/2″, 1″, 7/8″, 3/4″, 1/2″, 3/8″, and 1/4″ thick spacers. Stacking these under the guide board I should be able to vary the additional thickness by 1/8″ from 1 inch thick to 2 7/8″. If I need to go beyond that, I have some additional 1 1/2 inch blocks and some 3/4″blocks that are 5 inches long. for additional spacing. If I decide to cut some 6 x 6 timbers, I can find enough spacers to mix and match to a 6-inch depth.
This set of clamps is made from the Live Oak that I am cutting in Hilton Head. I am amazed at the denseness of the wood. It is amazingly heavy. I know that it still has a lot of moisture in the wood. It has been air drying since 2016 but given the density, I can see this wood taking a very long time to reach a dry state. If you are considering duplicating a set of clamps, I would recommend that you use Hard Maple, Hickory or another hardwood. Pecan would probably work well for this sort of project. The Live Oak is a variety of White Oak. Standard Northern Red Oak would probably do as well although it is considerably less dense than Live Oak.
Currently, I put a Tung Oil finish on the wood to slow down the moisture loss. This should keep the clamps as stable as possible as they continue to dry.
Let me know in the comments how they work for you.