Christmas Shopping
Every year for as long as I can remember, I would pop down to my shop in the basement and start making Christmas Presents. I have made a variety of stuff. I have made a bunch of salad forks and cooking spatulas. My latest design was a single fork with a spatula, basically a salad serving set. I upgraded the basic design by turning a finial on the handle and making the handle round. The Spatula and Fork were made from Black Walnut that I received in payment for making a waterbed frame for a friend in Pennsylvania. I have 5, 2 inch thick boards roughly 18 inches wide and 8 feet long left of this wood. Perhaps you will see a project made from the remaining wood.

One year a friend and I made a road trip up to the Adirondacks to pick up a bunch of pine and cherry wood (harvested on his mom’s property and air dried in a barn for several years) with this wood and some I had from another project, we created a dozen laminated clipboards, 6 cutting boards a cherry bedside stand and a large organizer we called the beast that was purpose-built for his dad, we also made several hand mirrors and 2 dressing table mirrors. We each had large families and lots of time to kill. Well, not lots. We drove to Lake Placid on October 6th and the finishes on the projects were just barely dry on Christmas.
That was back in the day when my shop was set up and in the basement. Now, the tools are in storage and I need to find a jewel in the rough to give my new significant other for our first Christmas together.
Found Wood
I was able to locate a couple of pieces of Cherry out in the woods that were slated for the burn pile. One piece was 8 inches in diameter and 3 feet long, fairly straight with bark on it that was still tight. This indicated to me that the piece hadn’t been sitting in the woods for a long time rotting.
I peeled back the bark and did find a few larvae in the bark. There didn’t appear to be damage to the underlying wood so I stripped off the bark and contemplated a Christmas Project. My special lady is very fond of Pelicans. I thought perhaps I could find one in this piece of wood.
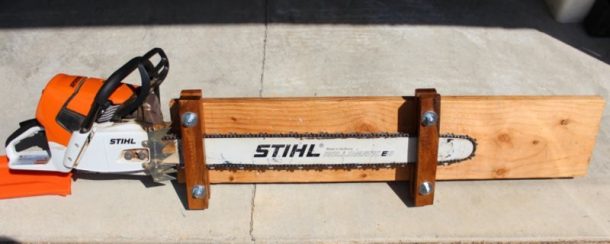
Roughing Out
I started with a small chainsaw roughing out the general shape and defining the wings, tail, and bill. Then I started hogging out the fine details with a 36 grit sanding disc in a 4-inch angle grinder. For this part of the process, I covered myself with dust so, after a few minutes of this, I grabbed a dust mask and ear protection. I still spent hours clearing out my nose at the end of the day.

I downloaded about 10 images of Pelicans in various poses from the internet, I estimated that this would help me to get the proportions right.
Refining
I used a variety of tools to refine the shape. I tried a Dremel tool with a burr cutter but the bit was too small and the high speed of the cutter and softness of the wood caused the wood to burn instead of removing it efficiently. I ended up using a rasp bit attached to a reciprocating tool to get the fine detail I needed in several places.
I opted to hand carve the feet with a chisel and mallet. I wish that I had a power chisel but I had to make do with what I had on hand. I was able to use the reciprocating tool with a plunge blade installed to carve out between the feet. I left a considerable amount of wood around the feet. I didn’t want to take too much wood out of the support for the bird but I wanted to give it some semblance of a leg. Sadly, the legs look more like those of an Owl than they do a Pelican. Everything has its compromises.
Repair
I worked on the shape over a period of 3 weeks, as I removed and refined the shape, I noticed a crack developing. It ran across the forehead of the carving and reappeared on the back of the neck. A second fault began to appear in the center of the back. I kept an eye on this as it developed and after about a week I decided that I needed to do something before the crack split the head in two. What was happening was that the heart crack in the wood was beginning to split as the wood dried. This needed to be filled to level the crack and to keep the carving from splitting more as the wood dried. Epoxy was the only solution. Filling the crack with Epoxy stabilizes the crack and fills it to create a smooth surface.

Heart crack developing in the center of the back of the carving. This image shows an early image of the crack just beginning to form.
I happened to have a small can of West System 105 Epoxy Resin and some 205 hardener. I purchased this to repair a few window sills on the house that I just sold up North. If you have never used this stuff, mixed with a bit of sawdust until it is a paste, you can fill just about anything. Give it 3-4 hours to set up and you can file it with a rasp. Leave it until morning (8 hours) and it is hard as a rock. The one drawback is that it is temperature sensitive. Below 60 degrees it has a hard time setting. As the temperature gets warmer, the cure time is reduced. So, on a hot summer day, the open time (time it can be worked) is considerably reduced. When this is fully cured it is sandable but smelly and the dust is somewhat toxic. It can be a bit expensive but has a long shelf life unmixed and is perfect for filling things and stabilizing rotting wood. Once cured it is highly water resistant. I learned about this product when I was building canoes. The inside and outside of the boat is coated in 3 coats of West System Epoxy over a fiberglass mat creating a smooth waterproof surface.
In this case, I used the West System Epoxy to fill and stabilize the heart crack. I mixed a small batch, added sawdust that I reclaimed from the oscillating sander dust collector, and pressed the fill into the crack as deep as I could get it. I was only able to penetrate half an inch but the runny nature of the Epoxy settled down into the cracks before it cured. I moved the carving inside the house once the Epoxy was in place to allow it a warm place to cure. A second coat on the following day filled in where the Epoxy had settled into the cracks. When sanded smooth it does show but does an amazing job of filling and preventing the crack from opening up more as the wood dries.

Heart crack after filling and sanding. The final finish has been applied to the Pelican. You can see how much additional cracking has occurred since the first image was taken.
Final Sanding and Finishing
After I had refined the shape to the best of my ability, I went over the entire carving with 100 grit sandpaper in an oscillating sander, then moistened the entire carving to raise the grain. A second sanding with 100 grit sandpaper smoothed the raised grain and a final hand sanding with 220 grit after a quick rubdown with a tack cloth smoothed the surface to my satisfaction.
A second pass with the tack cloth removed all of the sanding dust to prepare for applying the finish. I chose a high gloss Spar Varnish for the final protective finish. I had to move indoors for this process as Spar varnish needs to be warmer than 60 degrees to dry. I sanded lightly between coats and went over the entire carving with the tack cloth each time I applied. 3 coats were sufficient for a nice solid bright finish.
Result

Here you can see the finished product. As this is carved from Black Cherry, the reddish hue of the grain will darken to a deep red as it is exposed to the air and UV light from the sun. It will only get more beautiful as time goes on.
 As a long-time Woodworker, I've built a variety of large and small projects. I've learned to use the tools available to me to get the job done.
I'm currently outfitting my new shop. I need to work with wood or I'll go crazy.
Follow along on my journey to rebuild my woodworking shop and start a business from the ground up.