I found some trees.
Hurricane Mathew provided me with 4 substantial White Oak (Live Oak) trunks, a windfall in Tennessee has provided a 14-foot Cherry and another 24
I needed a way to turn these into usable wood. An Alaskan Sawmill seemed to be the answer. It is a reasonably priced alternative to the other solutions.
The problem is that it is still a substantial outlay of funds to purchase a chainsaw with enough horsepower to get the job done. I was, however, able to acquire a Stihl 661. I know that everyone doesn’t have this option but in my case, I scrimped and saved until I was able to afford the $1300 price tag for this monster saw.
I have been very impressed with the performance of this saw. When purchased, I bought it with a 32-inch blade and a crosscut chain (this was all that was available at the dealership). I also had previously purchased a 30-inch blade with its own length of crosscut chain.
To turn this saw into a sawmill, I needed to put together a jig that can guide the saw. I could go to Amazon and purchase a Granberg Sawmill (http://amzn.to/2B3LTnO) but after shelling out the price of the saw, I wanted to find a more affordable way to do this.
I saw this video from David Groth that was done in 2015 where he milled a redwood tree using a homemade version of the Granberg mill.
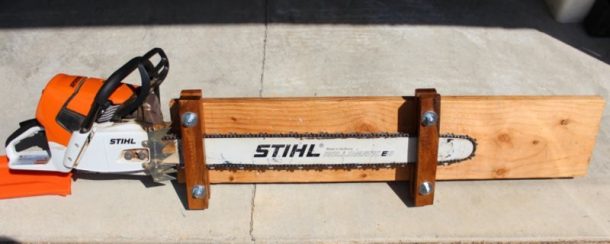
I liked most of what he did with the jig that he created although I didn’t want to drill holes in my 32-inch saw blade. To get around this I used the clamping system that Granberg uses.
I started with creating the plank that follows a flat surface. Home Depot has some 2 x 12s and, after sorting through the stack to find one with no cupping or twist, I selected an 8-foot piece. I also purchased 4 3/8 x 4 1/2 inch bolts, 8 nuts, and fender washers to spread the load. 2 2 foot 1/2 inch threaded rod with nuts and washers completed the supplies.

Since my chainsaw bar is 32 inches long and I wanted to have some protection in case someone comes too close to the moving chain, I cut the board to 40 inches long. I left a full 8 inches past the end of the blade to provide a bit of protection. It isn’t a shield but is a deterrent of sorts.
I then turned my attention to the clamping system. I needed a way to connect the threaded rods to the bar with a clamp that would hold tightly while vibrating but also to leave room for the chain to move past the clamp. I chose to use some parts from the 2 x 12 but in hindsight, I think I will remake the clamps from hardwood. The first solution needs to have some bulk due to the soft nature of the pine and the bolts tend to crush the wood fibers allowing the clamps to loosen up over time.

For the clamps, I cut 4 pieces of 1 1/2 stock 6 inches longer than the width of the blade with the chain installed. I left the center part of each piece full width and relieved the ends of each side so that the clamp, when tightened, would still clear the chain without rubbing (about a 1/4 inch). In the center of the top clamps, I drilled a hole for the 1/2 inch threaded rod and created a recess on the inside of the piece to hold a bolt which I epoxied into the recess. (two pieces only). The ends of the pieces received holes for a 3/8 inch bolts. When tightened, I added a second jam nut to the bottom of the 3/8 inch bolts to keep the clamps from coming loose. I also glued a piece of rubber on the inside of the clamps to provide a bit more friction and keep the clamps from slipping. I haven’t recessed these bolts but this could be done from the top of the clamp.
To install the clamps I positioned one near the base of the saw blade, and the other was positioned near the end of the blade. There is a mechanism at the end of the blade that spins and guides the chain around the end of the blade so I positioned this end back enough so that this mechanism was able to function unimpeded. I snugged up the 3/8 inch bolts and adjusted them so that the centers of the clamps were on a full inch increment then installed the 1/2 inch threaded rod into the nuts making sure that the rod did not extend down to the blade itself.

With the threaded rod installed I was able to measure and drill holes into the flat guide board. I fastened this with another 1/2 inch bolt and washer. When complete, the measurement between the blade and the bottom of the guide board was 2 inches. This will work for me at this point as I’m focussing on creating tabletops with live edges once the boards have dried sufficiently to be worked. By adding spacers between the guide board and the clamps I can adjust this distance as necessary.

This jig works well as long as I don’t need to cut a slab that is less than 2 inches thick. I will be remaking the clamps using hardwood so that I can get a thinner cut. If I do this with a hardwood like Oak or Maple I should be able to reduce the thickness of the minimum cut to an inch and still have sufficient strength to create sufficient clamping force to hold the jig in place.
At this point, I have used this jig for a single pass on an Oak log in Hilton Head and have completed a Cherry log in Knoxville. The Cherry is stacked and stickered in a carport for the time being. I discuss the process of preparing the Oak Log on the Live Oak Sawmill Project page and the Cherry log on the Black Cherry Sawmill Project page. Feel free to click on the links and view the projects.
For a future project, I’m considering putting together a solar kiln so that I can reduce the time and control the drying of these board a bit more