. Over the years I’ve had a lot of router tables. I’m not a big fan of commercial tabletop router tables, they always seem to be too small. there are quite a few manufactured router tables on the market, Rockler is a very popular model and they do have a nice aluminum plate or a Phenolic plate that you can buy to fit into your table. Ultimately, I have found that Building a DIY Router Table is the most cost effective solution that will give you the best product for your needs.
Early on in my Woodworking journey, I read an article from Wood magazine (This link is an upgraded model) that provided a very basic router table that clamped to the top of one of my work tables. This DIY router table had slots cut in the side of the table to adjust the fence back and forth. This was a very problematic adjustment. I decided that this time around I would add some dust collection and change the fence adjustment to run on T-tracks.
Finding a DIY Router Table Plan
 There are hundreds of plans for Router Tables available on the internet. Some plans need to be purchased but others are free for the asking. I often use Sketchup to design jigs and fixtures so the first place I looked was in the Sketchup 3D Warehouse. Even here the possibilities are hard to narrow down.
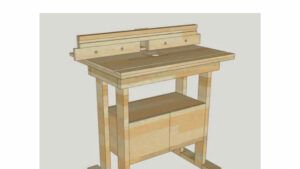
I chose a basic Router Table plan (https://3dwarehouse.sketchup.com/model/u716d971c-62b4-4f3a-889b-ae763b3e4f64/router-table) and downloaded it. I didn’t need a base as I was simply going to clamp it to my Woodworking Work Table while in use and store it away under the table when not in use. I was only interested in the major dimensions as I have used a homemade Router Table for years and just wanted a bit of a refresher.
Features of the Router Table
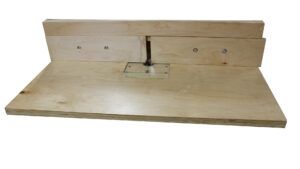
There isn’t a lot that needs to be worked out with a basic Router Table. There needs to be a stiff top and the Router needs a place to mount to the underside of the table. A plate that is adjustable needs to be mounted above the Router into the top of the table. This plate needs to be precisely flush with the top of the table.
The table needs to have a fence mounted to it and the fence needs to be precisely 90 degrees to the top of the table.
I’ve seen two main designs for fence adjustment. One has a pair of hold-downs on the back of the fence. The fence adjusts forward and back in a parallel path to the edges of the table. The second design has a single adjustable end and a pivot end. Adjustment is in an arc around the pivoting end. Either of these arrangements work quite well. It is mostly a matter of what you are comfortable with.
This video from Izzy Swan shows how you can build a quick disposable Router table with the pivoting fence. I didn’t want to go this basic and I wanted something that would hold up to hard use.
For my particular Router Table, I’m going to add a couple of moveable fronts to the fence and mount a 4” port on the back of the fence to accept my dust collection hose. The moveable front pieces will allow me to adjust the space around the Router Bit to accommodate different sized bits and still keep the workpiece supported. I can add more T-track at a later time or cut a miter slot into the table if I find that I need that capability. For now, I’m going to keep it simple and quick.
Building the Router Tabletop
The Sketchup drawing that I downloaded shows a tabletop that is two laminated pieces of ¾” plywood. I didn’t think that a 1 ½” tabletop was necessary so I opted to use ½” plywood. I think this works fine. I’ve read where it is important that the tabletop doesn’t flex but I haven’t noticed that this reduction is a problem.
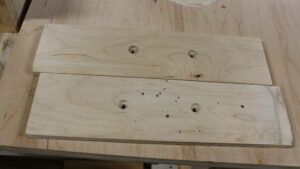
I cut two pieces of ½” Maple plywood to 37” by 24” and laminated them together with Titebond carpenter’s glue. I lined up the two pieces as well as possible but still had a bit of slippage. A quick pass with a flush-cut router bit evened up the edges. They aren’t precisely square but on a router table, a perfectly square cut isn’t necessary.
Adding T-Track for the Fence Adjustment
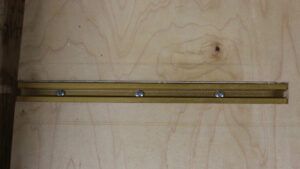
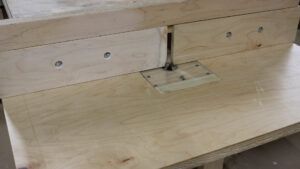
Next, I needed to cut two channels perpendicular to the back edge of the table for T-Track. The T-Track that I bought required a ¾” wide slot ½” deep. Fortunately, I have a Router, this makes it very easy to cut a slot for these T-Tracks.
To cut these slots into the table, I set up 3 pieces of scrap plywood with straight edges. Two of the pieces guide the Router in a straight line that is set perpendicular to the back edge and the third one fills the gap between the first two to act as a stop for the router. Careful measurement ensured that the center of the router bit was in the right place and a 3-inch spacer that is the same size as my Router base was used to check the spacing. I clamped this jig to the table and screwed the length stop in place to the guide rail pieces. I used a ¾” router bit and made two passes each ¼” deep. Using a hacksaw, I cut the T-Track to length and glued and screwed the pieces into the slots.
Mounting the Router In the Table
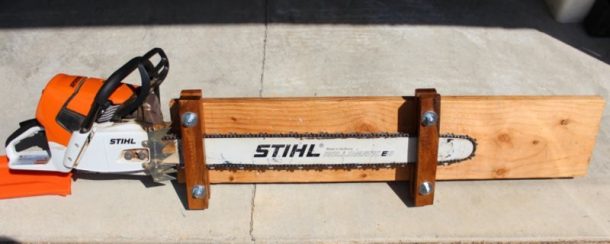
To mount the Router into the tabletop, I needed to cut a recess into the underside of the top. I suppose that the Router could be mounted directly to the bottom of the top but it is an inch thick and limits the amount of travel that the bit has for doing the actual work. I chose to make the recess round and the diameter of the Router Base.
To cut the recess, I again turned to the Router with a straight bit (I used a ½ inch bit). I have replaced the bottom plate of my Router with a sheet of plexiglass so that the bit is easier to see. I just hand routed the recess in two passes of a ¼” each.
I set the Router base into the recess making sure that it was oriented so that I could reach the adjustment release. On my Router (Porter Cable 690- The Porter Cable 690LR is the replacement model now- get the fixed base /Plunge base combo if you can afford it) the adjustment is a large wing nut. Mounting it to the front of the Table allows me to release the Router and adjust the height easily.

On my last Router table, I mistakenly oriented the release on the back and spent a lot of time trying to reach the adjuster around various obstructions.
I marked the location of the screw holes and drilled a pilot hole for each of the 3 mounting screws. From the top, I countersank these holes to accept a flat head screw for mounting to the table. I mounted the Router base to the bottom of the table and with a ¼” bit rotated the Router into the base with it running until the bit drilled through the top. Then I unmounted the Router from the base and using a hole saw, drilled a 2” hole in the tabletop using the routed hole as a guide for the hole saw.
I have some large panel raising bits but this should be a good size for most of what I need it for. I did cut another recess in the top to fit the router sub-base that I use for my handheld routing. This sub-base is a ¼ inch piece of plexiglass with mounting holes recessed into it. It fits either on the router base directly or into the recess in the top of the router table. I added 4 flat head screws into the corner of the recess in the router table to adjust the plexiglass to be flush with the top of the table.
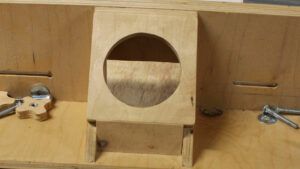
DIY Router Table-Fence
A Do it Yourself Router Table Fence can be as simple as a straight board clamped to the table or it can be a precision-ground steel fence with grooves for accessories and a miter slot. I chose to make a simple fence with a precise right angle and sliding front pieces to focus the air around the router bit and support the workpiece on each side of the cutter head. On the back is a 4” port to accept my dust collection hose.
For the fence, I needed to have a stable surface. I used ¾ inch Maple plywood for this (Birch Plywood is the preferred material but for some reason, it isn’t available in this area). This higher-end plywood has 3 laminations and no voids. This makes for a strong and stable surface.
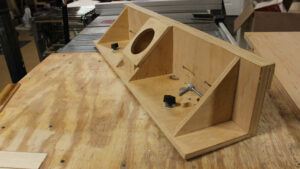
For my design, I needed a base, some 90-degree gussets (4), a front, a top cover, and two sliding front covers. The Base and Front parts are 6 inches wide and 39 inches long(The width of my tabletop) The Base has two ¼” holes lined up with the T-Track in the Tabletop and I cut a semicircular relief out at the center (2 inches wide and 2 inches deep) to allow the dust from the Router to be pulled in to the dust collection port. The front has 4 slots cut to allow the sliding front covers to be adjustable.

I assembled the front to the base and clamped the 90-degree gussets to the front and base. The Front piece goes in front of the base and not on top. This makes the front piece sit on top of the tabletop. When you cut the 90-degree gussets, cut a relief in the top and back so that I have a place to clamp the parts. I didn’t do this and gluing was a real pain. I had to clamp an angle bracket and to the front and base. I used lots of clamps and had to wait until the glue set to move on to the next one. Make sure that while the glue is setting, the base and front are precisely 90 degrees from each other. The gussets should hold this angle but verify it just the same.
.When the glue is dry, glue a 3-inch piece on the front top of the front of the base. Space this piece 3 inches up from the bottom with the sliding front pieces. Leave enough room so that the lower pieces will slide but be guided by the top piece.
Mark the back of the lower sliding pieces at the center of the slots that you cut into the Front piece and drill holes for ¼” Carriage Bolts. Drill a small pilot hole first, then using a Forstner bit, drill a recess in the front so that the head of the Carriage bolt is recessed. Then finish drilling the hole for the shaft of the Carriage Bolt from the front of the sliding pieces. This will give you maximum travel from the sliding front pieces.
The last bit of work that needs to be done is the dust collection port. One piece is attached to the two center supports. A 4” hole is drilled or cut out to accept the hose from the dust collector. A second piece closes up the back of the chamber to direct the dust up into the collector hose.
Putting Together the DIY Router Table
To assemble the Router Table, mount the fixed base of the Router into the recess in the bottom of the table. Screw through the top and verify that the screw heads are recessed below the plane of the top. Insert the carriage bolts through the front of the sliding front pieces of the fence and thread on a handle for each bolt. Insert the ¼” machine bolts into the T-Track and fit the bottom of the fence over the bolts, then secure these with a nut or handle to tighten the fence to the table.

Clamp the table onto a work surface and insert the Router into the fixed base attached to the bottom of the table. Ready to go!

DIY Router Table First Test Run
My neighbor was working on his daughter’s house. He had a large amount of baseboard that he needed to install and a shed full of Red Oak planking. He wanted to create a round-over on the top of the planks so that he didn’t need to add a quarter round to the top of each plank.
With the Router Table, it was quite simple to create this round-over.
Step one was to install the Router Table on my mobil work table and set up an out-feed roller stand near the Router. Then, connect the dust collection to the port and install a 1/4″ round-over bit into the Router. Next, we adjusted the height of the bit to round the edge of each board. This just removed the corner, a second pass will deepen the first cut and create the profile that he wanted with a 1/8″ reveal on the profiled edge.
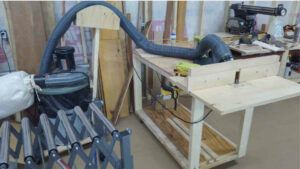
Then it was time to don the ear protection and dust masks to keep us safe, fire up the dust collector and start routing the profile. After the second pass, we called it a successful test run.
Overall, I was pretty pleased with how well building this DIY Router table went. I will probably do a few enhancements to this table in the future. It may be nice to have a miter slot near the front of the table to help with keeping tenon joints square to the end of the workpiece. I have used square back-up blocks for this operation but it would be more stable and precise with a jig installed in a miter slot.
Every project in the shop is a work in progress. If I need to modify or enhance one of my tools, I won’t hesitate to make the changes.
I’d love to get your feedback on this project. Feel free to comment below and let me know how you have enjoyed this post and if you have tried something like it in your shop.