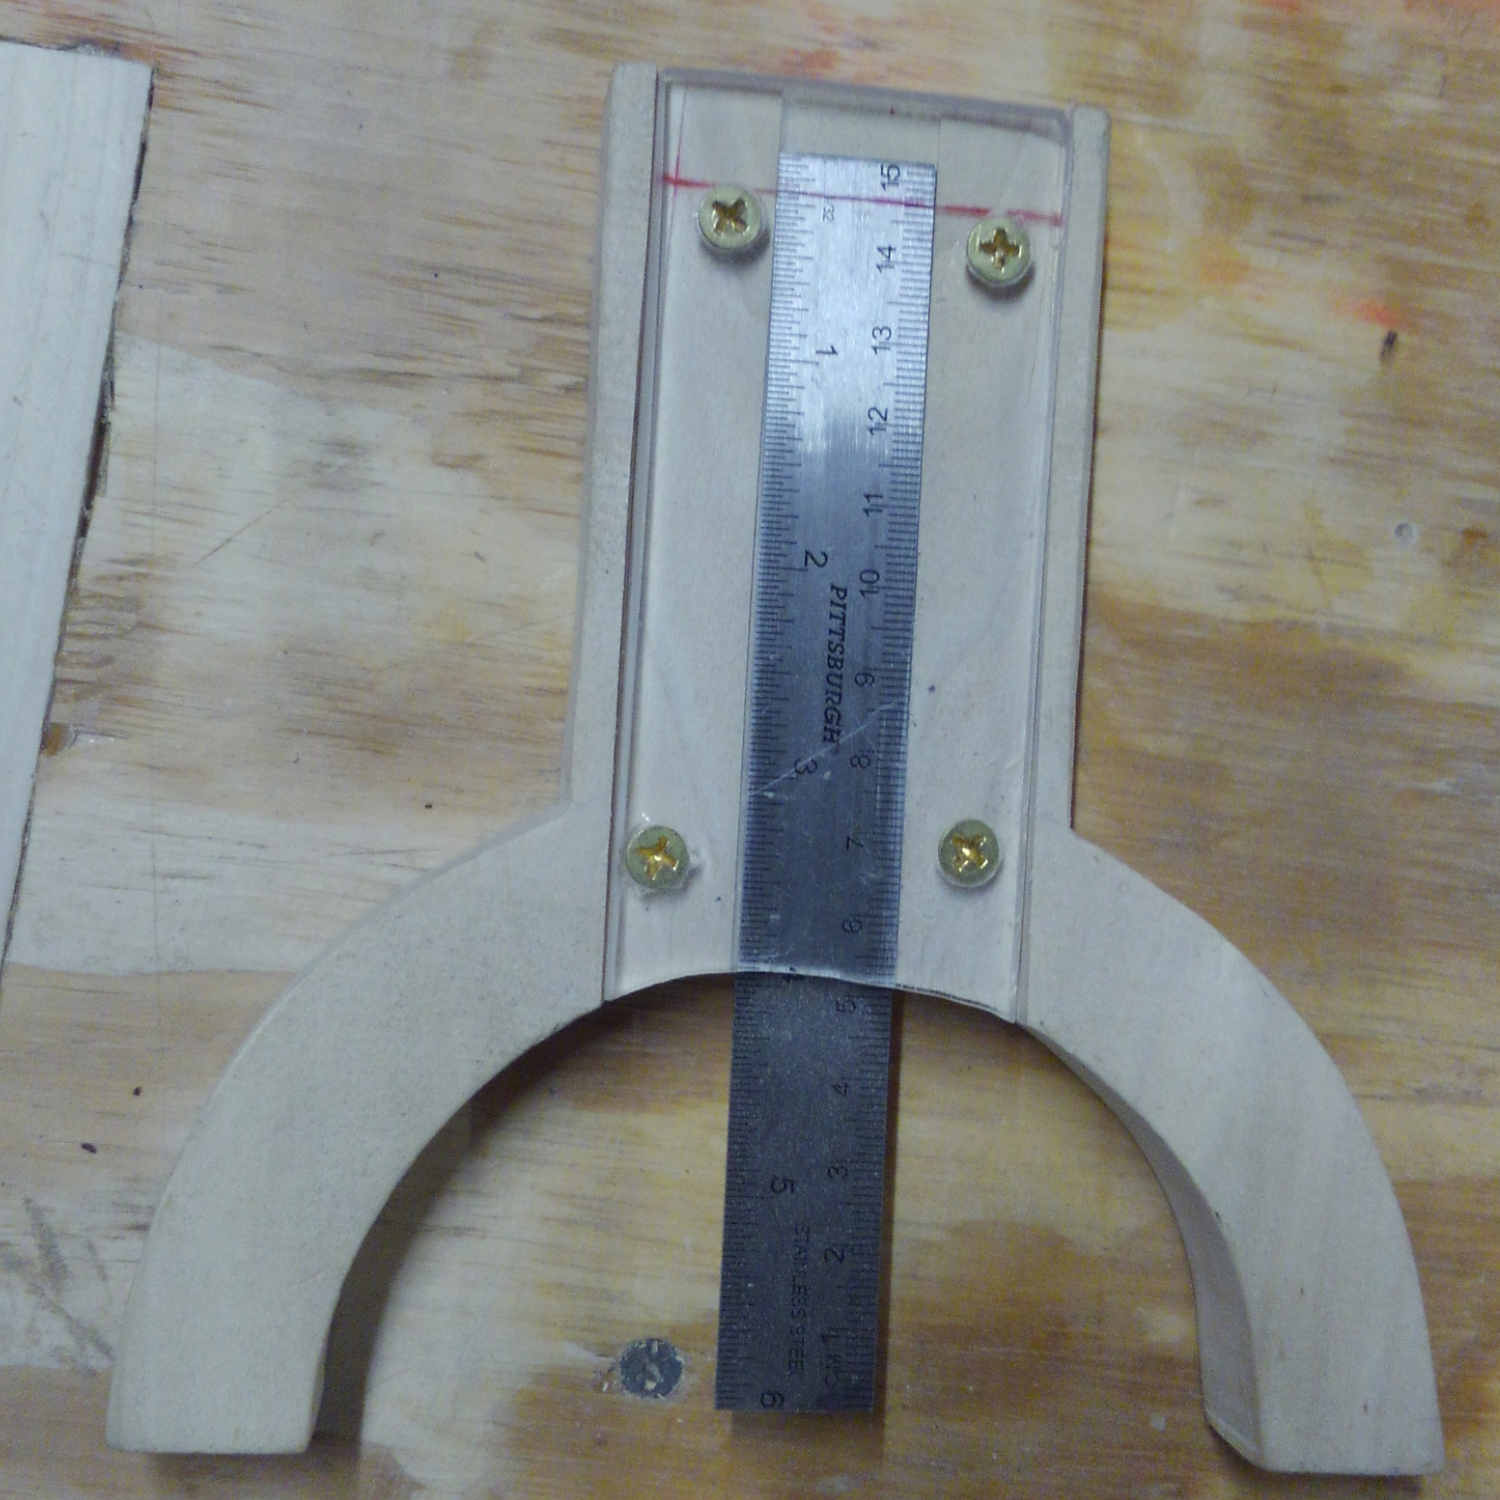
With my Router Table complete,I needed a quick way to set up the router depth. In my travels, I have run across several designs for a quick little Router Depth Gauge that will make adjusting the fence and the height of the router bit quick and easy.
Wood Work Web created a similar project to set-up a Tablesaw.
I’ve included the video here to show you what the capabilities are for this simple gauge.

 I hope you enjoyed this short project. I know that I’ll use it often.
It will come in handy for my next project. I’m going to be creating some adjustable sawhorses.
Feel free to comment below on this project or any other that you see on this site.
Creating
This is a pretty simple project and is one that will provide benefits for many years to come. I hope you’ll follow along and perhaps create your own.Designing the Router Depth Gauge
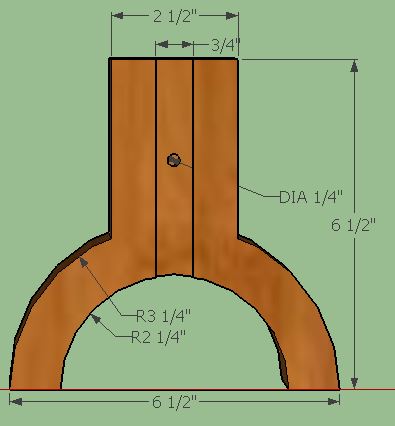
This Router Depth Gauge can be used for a handheld Router or in a Router Table. I decided for this one to use a 6-inch rule and make the piece 6 1/2 inches high and 6 1/2 inches wide. This is not a hard and fast rule. If you want to make it versatile, you can make it a bit larger (around 8 inches) and it will fit around a saw blade to set the blade height and fence for your table saw as well as use it with the Router to set up the depth of cut and the fence position. Since I just completed the Router Table, I made a depth gauge for this piece of equipment. I can still use it to set the blade depth on the Table saw but the fence position can only be used when the blade doesn’t stick up too high. For this gauge, I chose a piece of nice straight grained Poplar ¾” thick that I had left from another project. The top of the gauge that holds the ruler is 2 ½ inches wide and the two radiuses at the bottom of the gauge are 3 ¼ and 2 ¼ inches. This Depth Gauge is designed around a 6-inch ruler that is ¾ inch wide. Here is a drawing of the setup gauge.
Layout the Curves and the Recess for the Ruler
To layout the shape of the Router setup gauge, I first located the centerline of the piece. I measured ⅜ inch on either side of the center (my ruler is ¾ inch wide) and marked two lines so that I can set my Router Table Fence to the correct distance from the edge. Next, I set my compass to the large radius (3 ¼ “) and drew an arc from the centerline. I followed this with the small radius (2 ¼”) to lay out the smaller arc. When you do this layout make sure that the grain is running up and down the part and not across. This will make a much stronger gauge. Of course, if you are using plywood for this gauge, then grain direction isn’t a factor for strength, it just makes the gauge look better.Make a Groove for the Ruler
There are several ways that you can create a groove to fit the ruler for your depth gauge. My first choice would be to use a Router Table and a fence. The same thing can be done with a Table Saw or even cut by hand with a layout knife and a chisel. I chose to use a router. I installed a ¾ inch Straight bit in my Porter Cable Router measured from the edge of the bit to my layout lines on the part and set the depth of the bit to ⅛ inch. The ruler measured just under 1/8 “ thick so this seemed like a good depth to start with. If I had completed the gauge that I’m currently working on, I would just set the gauge and move the fence to the correct location. Since I haven’t completed it yet, I used my combination square to make the adjustment and double-checked the measurement several times to verify. One side of the bit was at 5 ⅞“ the other was 6 ⅝”. I verified that the fence was set correctly from both the infeed and outfeed side of the bit. Then it was just a matter of running the piece through the router and checking the fit to the ruler. Since my bit was ¾ inch and the ruler was also ¾ inch, I found that the ruler fit was good but there was no way to adjust the ruler. The fit was just too tight. I could have corrected this with some sanding but I decided to make a second pass with a slight modification. One way to get a slightly larger slot would be to just bump the fence a touch. I decided to wrap a sheet of paper around the side of the part that runs on the fence. A standard sheet of notebook paper is about 1/10 of a millimeter so this should give me the slip fit that I need. If it isn’t quite enough, I’ll repeat the process with the other edge. One single pass was sufficient to get the ruler sliding easily in the groove.Cut the Shape
Next, I turned my attention to the half-circle that needed to be cut to shape the legs. I chose to cut these on a bandsaw but you could use a scroll saw, a jigsaw, or even cut it by hand with a coping saw. I started with the inside bottom of the piece. when I cut the groove for the ruler I eliminated part of the line so I touched that up first and then I cut the half-circle. Then I got the straight lines for the top part and finished with the outside half circle coming in from either side. When I’d finished cutting it out I touched up the saw marks with some 80 grit sandpaper and finished the job with some 100 Grit. I eased the edges a little as I was sanding.Add the Magnet
If you are using a steel ruler, and have a loose fit for the ruler, you might want to add a small button magnet to your Depth Gauge. This should be inserted under the ruler to keep it in place during use. I happened to have a package of ¼ inch Neodymium magnets in my store of things so I drilled a hole under where the ruler slides and glued it in place in the recess. I placed this 2 inches up from the end of the ruler recess.Create a Hairline Indicator
To make an indicator for your ruler, you will need a piece of Plexiglass. I used a ¼ inch thick piece because I had some laying around but ⅛ inch thick is fine. I cut mine to 2 inches wide and 4 ½ inches long. Set the Depth Gauge on something. Place the ruler into the groove and slide it down until it touches the tabletop under the gauge. This will give you a reliable location for the zero point. Place the Plexiglass over the ruler and temporarily clamp it in place. Using a combination square, line up the edge of the square with the zero point of the ruler. Scratch a line across the Plexiglass with a sharp knife. One single score line across the Plexiglass. Grab a sharpie marker. I used a red one as the red line shows up well. If you are color blind, a black marker will work as well. Make a mark along the line. The marker will leave a thick line. Using a bit of isopropyl alcohol and a paper towel, wipe off the line you just created. The ink will stay in the scored line and clean off the flat area of the Plexiglass.Install the Indicator
Insert the ruler into its slot and position it so that it sits flat on a surface. Align the indicator mark with the zero point on the ruler and clamp the plexiglass into place. Drill four holes for small screws into the plexiglass. Fasten the plexiglass into place and the assembly is complete.Trim and Finish the Router Depth Gauge
Anywhere that the Router depth gauge has sharp edges, run some 220 grit sandpaper over the edge. the edges and corners of the plexiglass need to be smoothed a little bit in most cases. Your tool doesn’t need much finish, in general, I’ll run some tung oil over it just to give it a little protection. I hope you enjoyed this short project. I know that I’ll use it often.
It will come in handy for my next project. I’m going to be creating some adjustable sawhorses.
Feel free to comment below on this project or any other that you see on this site.

