Last Fall my sister asked for a Serving Bowl for her birthday. She had a large flat serving bowl that had been used by her Mother-In-Law for many years and passed down to her when she passed. The large flat bowl had finally succumbed to long-term use and the side had broken. My sister needed a replacement so I stepped up and created a Carved Cherry Serving bowl for her to use to replace the broken heirloom. I hope that the replacement will fill the need and become a family heirloom in its own right.
Finding a Good Design for the Carved Cherry Wood Serving Bowl
I’ve been getting Fine Woodworking magazine for many years. Occasionally, they will provide special editions for various focuses within the Woodworking niche. One, in particular, was dedicated to handwork. In the back of this issue was an article on carving a wooden bowl using an Adze, Spokeshave, and a Hatchet.
I liked the design but wasn’t interested in using their process to create the bowl. I’m going to use the design and power tools to create a similar dough bowl.
This design is an elongated bowl hollowed out in the center and has two “wings” for handles. One at each end of the oval-shaped bowl. It is a freeform bowl so there aren’t any square corners or sharp edges anywhere. This is a good choice for a hand-carved bowl( even if I’m actually carving with power tools).
Selecting the Wood for the Cherry Serving Bowl
To start this project I needed a piece of wood to work with and I happen to know that there was a pile of firewood that hadn’t been split yet so I selected a couple of pieces of cherry that were roughly 15 inches in diameter and about 24 inches Long.
I started debarking the first piece and on one side it had a large divot in the side. As I started cleaning this out I realized that some rot had started and, being in Tennessee, the termites had moved in. I decided that this would get split and go right into the fire.
I moved on to the next piece. The first thing to do was run it through my bandsaw and split it down the middle so that as it dried the heart crack would not spread into the wood. Since I didn’t see any additional critters hiding in the wood when I split it in half, I went ahead and debarked it.
Laying out the Shape of the Cherry Serving Bowl
I wanted this to be an oval bowl So I started to layout the shape of the bowl on top. The layout needs to be in the shape of an ellipse.
An ellipse has two specific axes. It has a main axis which is the length of the ellipse and it has the height or the width of the ellipse. The long axis is the primary axis, the width is the secondary axis. The first step in creating this on the top of the bowl is to find the center point and draw a center line and then determine how long you want the primary axis of the bowl to be. Next, you will draw a perpendicular line across the width of the bowl from the center point.
To layout the ellipse, you need to determine where the focal points (the pivot points) need to be located. Measure half the distance of the Primary axis and strike a point from the end of the secondary axis to the Primary axis on each half of the Primary axis. Using a compass or a set of dividers will make this easy.
Place a tack or small brad into each end of the primary axis. Stretch a string tightly between the two pins. Pull the pins out and move them to the focal points that you found in the last step. Now you have a loose loop of string hooked on the brads. Place a pencil inside the loop and use the loop as a guide to draw the ellipse.
Repeat this process adjusting the measurements in or out to layout the wall thickness of the bowl or just trace the original ellipse with a compass set to the wall thickness.
Also, lay out a smaller ellipse on the bottom of the bowl. This will give you a flat place on the bottom of the bowl for the bowl to sit securely.
Carving the Cherry Serving Bowl
When I read the original article for this bowl they were using an adze and a hatchet to layout to shape of the bowl. I don’t have a good hatchet for carving and I’ve never owned an adze. I was left with trying to carve it with chisels or gouges or using my Arbor Tech mini carving system.
I decided the Arbor Tech was the way to go. I also have some flap sanders and sanding discs that fit on my angle grinder. I used them to remove stock, mostly on the outside of the bowl.
I started on the inside of the bowl and removed about an inch and a half down into the bowl. Grinding away with the Arbor Tech removes stock very quickly. I needed to set the depth of the bowl so that I knew how far to go. I carved a trough at the midpoint of the width and using a dowel stuck through a piece of wood, I measured the depth that I was going to go. When I had established the bottom depth of the bowl, I went ahead and continued to grind with Arbortech. While I was doing this I held the bowl clamped down to my workbench top. Since I needed to hold it in various ways and turn it frequently, I often would just hold it between my knees and carve from there. It’s not a very safe way to do it but it seemed to be the most efficient way to remove stock from the far side of the bowl.
It would be wonderful if I had a Roman workbench to work from that I could clamp using either wedges or holdfasts.
When I got it to a shape I liked then I moved to the outside. I used the grinder and the Arbortech to hollow out under the handles and shape the outside of the bowl making sure that I left a flat oval on the bottom of the bowl for it to sit on.
I kept the walls of the bowl even by moving my fingers and gauging how far apart they were. Eventually, I found my bowl caliper that gave me a measurement of the bowl thickness just so I could keep it uniform.
Finishing the Carved Cherry Serving Bowl
When I was happy with the shape on both the top and the bottom and the sides were relatively even I started with sanding. I went from 120 grit all the way through 500 grit. On the outside, I was able to use a random orbit sander, on the inside I pretty much had to hand sand the whole way through.
For the finish, I used Minwax Tung oil. I applied six coats letting it dry in between and sanding with 500 grit paper between coats. I wiped the surface with a tack cloth to remove the dust then reapplied the next coat.
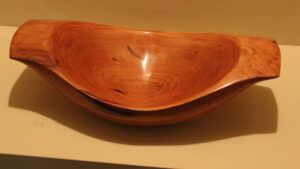
Finished Carved Cherry Serving Bowl
Here is a picture of the completed Serving Bowl. This was a nice project that I’m sure will get lots of use at my sister’s house. It’s a good size to display or can be used to serve pasta or salad to a crowd. The Minwax Tung oil is fully food safe once it fully cures ( about two weeks).
While working on this project, most of the tasks were straightforward. Holding the irregular shape of the bowl was the most difficult problem. It is much easier to hollow the inside of the bowl before the outside has been shaped. For this, I clamped the ends of the bowl with wedges and worked the inside and outside near the center to define the walls and hollow.
These are the tools I used while carving this bowl:
An Alternate Bandsaw that runs on 110 VAC :Laguna 14BX