Live Edge Wood Benches

We were invited to spend Thanksgiving sitting around a campfire.  There wasn’t enough seating for all of us. I happened to have some Yellow Pine that I slabbed last year so I thought some nice live edge wood benches would be a nice addition to the party.

When this idea germinated there were only a few days before Thanksgiving but I was up to the task.

I had an 11-foot board that was about 17 inches wide and 2 inches thick.  This would do nicely.
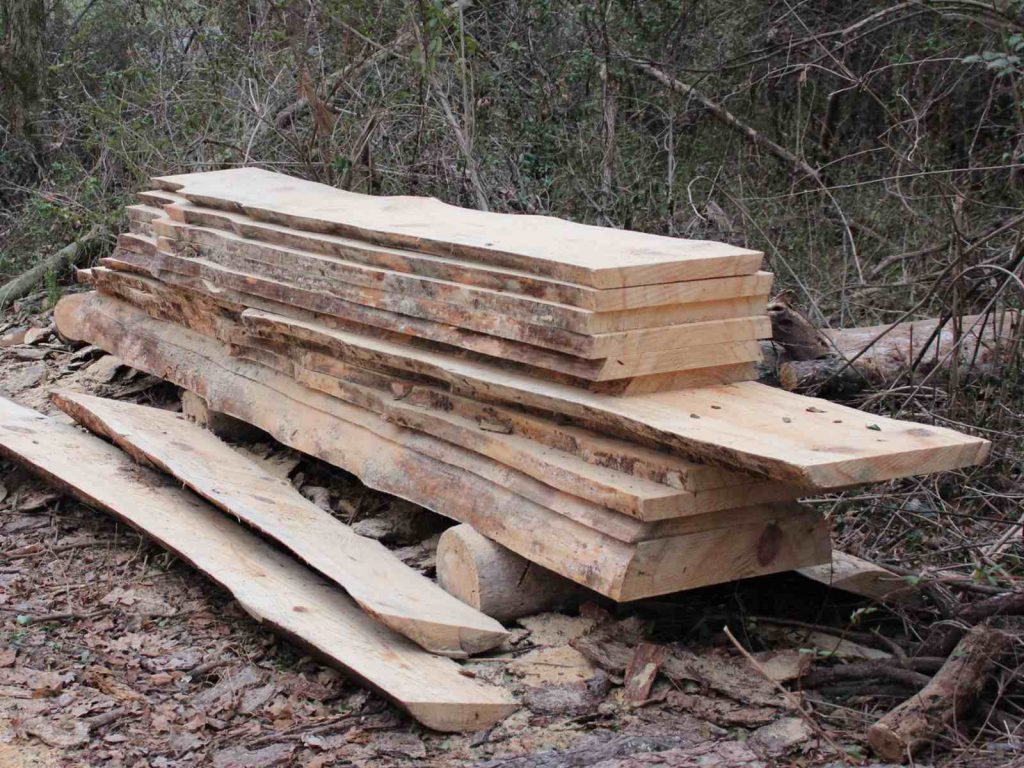
Yellow Pine Log Final Stack of Lumber

Sizing the Live Edge Wood Benches

I wanted the benches to be 19 to 20 inches tall so I determined that 18 inches would be the optimum length of the upright legs.  I would create a mortise in the top for the legs to fit into and drill through the top for Lag Bolts.  A crosspiece between the legs would stabilize the entire assembly.

We wanted to have room for 2 people to comfortably sit on each of the benches so 32 inches seemed to be the right length for the benches.  I cut the first one to 32 inches but when I got to the end of the board, there were only 28 inches left.  One bench 32 inches long and the other 28.  These seemed to be adequate for what I was trying to do.

Cutting the Live Edge Wood Benches to Size

The big problem when working with live edge boards is that there is no square edge to reference.  Before you start to cut, you need to create a reference line to work from.  Snapping a chalk line down the middle of the board solves this problem.  It provides a reference for you to complete your measurements and establishes a benchmark. It doesn’t really matter where on the board the chalk line happens, but it needs to be there to provide a reference for all of the other measurements.

I snapped a chalk line along one edge of the board.  This gives me a good bearing surface for my Carpenter’s Square. I used this reference to mark off square lines for the cut.

I cut each marked length and then measure for the next.  This provides additional accuracy.  If I measure all the distances at one time I need to worry about the thickness of the saw blade and the dimension may wander by 3/16″.  Measure twice, cut once to maintain accurate dimensions.

When I started cutting the pieces to size, my Circular Saw decided to quit.  It was a Craftsman Contractor Grade Circular Saw that I bought when I was working in construction back in the ’80s. I think I’ve gotten my money’s worth out of that saw.  I suspect, from the failure noise that it created as it quit that I may be able to just replace the brushes on it and get some more life out of it.  That is if I haven’t damaged the commutator when the brushes reached the end of their life.

I headed over to Lowes and picked up a replacement.  I bought a Porter Cable 7 1/4″ Circular Saw for right around $50.  I’ve had pretty good luck with the Porter Cable equipment so this is a brand that I’m comfortable with. After completing the cuts with this new saw, I’m quite impressed with the quality of the saw.  I am amazed at the power that it provides in the lightweight package.

The end result?  I ended up with 4 precisely cut 18-inch legs, 1-32 inch top piece and a 28 inch second top.  I still needed to have a crosspiece for each bench.  I turned to my pile of cast-offs from dismantling some pallets.  One piece of poplar and a nice piece of Red Oak stepped up to fill this need.

Cutting Dados for the Legs

I needed a dado cut for each leg.  By cutting a recess 3/4 inch deep the legs are captured and stabilized so that they will never move.  This also creates a stronger connection to the legs by providing a gluing surface.  Since the Yellow Pine is just air dried, it may have a tendency to crown in the future.  Capturing it in a groove will minimize the amount of movement that will occur.

Instead of capturing the legs in a mortise with a recess the Dado goes all the way across the bottom of the bench top.  This doesn’t look nearly as good but I was limited by time so this was the most efficient way to proceed.

To make sure that the Dados were straight I created a guide for the new saw. I cut 5 inches off the factory edge of a piece of 1/4 inch plywood then glued it to the top of a 10-inch piece.  I used the factory edge to guide the saw on one side cutting a line using the saw guide.  Then I repeated the process on the other side with the other side of the guide on the saw.  Now I have a guide customized to the saw that allows me to line up the guide to the cut line and cut a straight line every time.  I could have spent lots of money purchasing a track saw but this homemade guide works just as well in most cases.

I used the Circular Saw to make multiple cuts inside 2 lines set 2 inches apart.  The outside line was 4 inches from the end of the board. I knocked out the waste and cleaned up the bottom of the notch with a chisel.

Through Mortices and Tenons for the Legs

With the bottom of the top ready to accept the legs, I turned my attention to the mortices in the legs.  One crosspiece with tenons and a through mortice in each leg.

Tenons

When I cut tenons, I will typically mark the layout with a knife.  This keeps the edge of the grain from tearing out if I use a power saw to cut them.  If I hand cut them with the Japanese Ryoba saw that I have, I make a second score line that creates a channel on the waste side of the cut to guide the saw.

In this case, I set up the Radial Arm Saw to remove 1/4 inch of material from the sides and then cut about a 1/2 inch from the ends of the tenon.  With a sharp chisel, I then pared down the edges of the material to the scored lines.  Final dimensions of the tenons were 3/4″ by 3″.

Mortices

The important thing to understand when cutting through mortices is that you need to cut from both sides.  If you only cut your mortice from one side the back side will chip out.  So, the layout needs to be precise.

I laid out the mortice 10 inches up from the base of the legs and centered on the width.  I traced around the tenon that I cut for that end. and located the center of the layout by connecting the corners of the layout with a pencil line. Then I transferred the lines using a framing square to the opposite side.

To make sure that all of my measurements were accurate, I drilled a 1/16″ hole through the center of the leg at the layout center.  It came through the other side with minimal tear out and was exactly where I expected. I traced the tenon on the outside of the leg and cut the outside markings with a layout knife.  This gives a precise location for the chisel and keeps the grain from tearing out as I chop the mortise.

I removed most of the wood for the mortise with a 5/8 inch Forstner Bit chucked into my hand drill.  I cut a bit past the halfway point from the outside and then completed drilling from the other side of the leg.  I overlapped the holes so that most of the wood was removed and the final size and shape of the mortise could be refined with chisels.

Putting it all together needed a bit of refinement as I had to fit the tenon multiple times to refine the edges but the end result was a nice tight fit and sharp edges to the mortices.

Assembled Wood Bench

Final Assembly of the Live Edge Wood Benches

As a test fit, I put the mortise and tenons together and then inserted the top of the legs into the dado slots in the top of the bench.  Everything lined up nicely.  I laid out and drilled 3 7/8″ holes  1 inch deep over each leg then drilled through with a 1/4 inch drill bit.  These will accept 1/4 inch lag bolts.  I wrapped a piece of tape around each bit (7/8″ Forstner bit, 1/4 inch standard bit) to give me a reference for the depth of the recess.  I tried to put these on my drill press but there wasn’t enough space to reach the center of the top.  A hand drill was fine for this application.

I disassembled everything and added glue( Titebond II) to the dados and the mortise and tenon joints.  Then I screwed in lag bolts to hold the top tightly to the legs.  Each of these was covered by a piece of dowel and sanded flush when the glue was dry.

I wiped up any glue that squeezed out of the mortise and tenons and cleaned up all the drips to make sure the benches looked presentable.

Everything got a light sanding.  I wanted the benches to look rustic and didn’t want to remove all of the milling marks from the top and sides.  I didn’t want anyone to get a splinter in their backside though so a light sanding with my random orbit sander and 100 grit sandpaper was all I needed to do.

Over the years I have found that pine responds well to a wet wipe down.  This raises the grain in the pine and keeps the grain from sticking up as the finish is applied.  So, I wiped the entire bench with water and let it dry for about an hour then resanded.

The finish on these benches was Teak Oil.  They may be outside at some point and the Teak Oil has UV protectant.  It is also a bit more water resistant than the Tung Oil I use for an interior finish.

3 coats of Teak Oil with a day between each to dry finished the project. I lightly hand sanded with 400 grit paper between each coat and removed the sanding dust with a tack cloth.  This provided a smooth finish that allowed the grain and milling marks to be prominently displayed but felt like a fine smooth finish.

I was pretty pleased with the result.

Finished Live Edge Wood Benches by the Fire


Handcrafted Wooden American Flag Wall Hanging

I had a bit of shiplap saved from a project that we were going to do to the house in Hilton Head.  Since we no longer have the house down there, we had 13 8 foot long pieces of the shiplap that were just sitting around. I have seen some folks making American Flags on various craft sites and have heard of people making a good living from selling these.  Then my girlfriend’s brother indicated that he wanted one to hang in his store.

Well, I didn’t want to make him one but thought I would take the shiplap that I had and create a Handcrafted Wooden American Flag Wall Hanging for my own shop wall.  Of course, I’m still working on a permanent place to work but it can’t hurt to have some decorative items to dress the place up when I find it.

How Big to Make the Flag

I have done some research into the correct size to make a flag.  I could use the g–spec dimensions which are the official dimensions for flags flying on government buildings.  In common use, flags are standard sizes with ratios of the length to a height varying from 1..5 to 1.667 (G-spec flags are 1.9).

The size of the field for the stars, the spacing and the dimensions of the 13 stripes and the stars are also specified as ratios of the length and height.

Flag Dimensions Image

I sat down and determined that I wanted to have a 60 inch flag. The common display size for this is a ratio of 1.667 making the stripes very close to 2 3/4 inches.  I settled on these dimensions:

3 by 5 flag dimensions

Get Our Free Flag Sizing Spreadsheet


Sign up to Our Mailing List and we will send you our free Flag Sizing Spreadsheet

A Subscription to our email list will provide you with notifications of new posts, occasional free plans, downloads and reviews of products we have tested or used.

We don’t like Spam and you shouldn’t either.  We will never sell or distribute your email to anyone else.


The Background of the American Flag Wall Hanging

While often people will make their flags one level deep, I wanted to have a flag with some depth so I decided to layer the boards on top of one another.  I started by laying out shiplap cut ot 60 inches long.  I screwed these to a pair of backing plates with 2 screws per board.  I gave them a quick pass with my belt sander to level them off and remove most of the primer coat that they had been sprayed with.

I then trimmed the width to 29 3/4 inches with a skill saw guided by a straight edge guide.

Finally, I gave the entire background a coat of off-white stain.  I wanted the flag to be a bit rustic and to have the grain show through.

The Stripes and the Field of the Flag

The next level of the flag is the stripes.  I fired up my Radial Arm saw for this one and set the width of cut to 2 3/4″ to cut the 7  red stripes.  Then I adjusted the width to remove 1/8 inch from the tongue of each of the leftover boards so that I could glue up the Blue field without spacing.

Each of the shiplap boards has a tongue that is 5/8 inch long but the overhung piece is 1/2 inch.  When these are glued edge to edge an 1/8 inch spacing is created. By removing the extra 1/8 inch from the tongue, I was able to make the field tight and appear as a solid piece.

Unstained American Flag Wall Hanging

I ended up with 3-60 inch stripes and 4-36 inch stripes all at 2 3/4 inch width.  The field is 5 boards 3 full width and 2 trimmed to make up the 19 1/4 inch height of the field.  I stained the stripes a dark Red and the field a dark Blue.

When the stain was dry, I glued all of the boards in place and clamped them down with cauls stretched across the boards to hold them tightly to the background while the glue dried.

The Stars

Laying out the stars was a bit of a challenge but they ended up 2″ tall.  The points were 72 degrees and the full circle radius was 1.1 inches.  I marked out the angles on the circle and just connected the dots.  I carefully cut one for a template and then laid them out on a sheet of luan plywood. I had originally intended to make 50 stars but after cutting for a while, I settled on the round Betsy Ross design with 13 stars in a circle pattern.

Star DimensionsStar Template


I bought some metallic grey paint for the stars.  This makes them stand out against the Blue field but is a bit different than most of the white stars that I see people using.  I like the effect but the contrast is quite subtle.  In the sun, the raised stars with the subtle contrast make an outstanding effect.

Pulling it all Together

Now that I have all the parts stained and sized it was just a matter of putting it all together.  I started with a red stripe at the bottom of the background and used the other stripes as spacers to keep everything aligned as I glued the next stripe in place.  Each strip was glued and clamped at the ends.

When I reached the field I placed that in the upper left and continued up the Right side with the short red stripes.

When everything was in place, I clamped 4 scraps across the entire flag and added some thin spacers under the center of the flag.  These provided extra pressure in the center so that the glue spread nicely.  A few extra clamps around the edges made everything secure while the glue set.

I laid out a paper circle on the field with marks at the locations where I wanted the stars to be and lined them up with the inside bottoms of the stars on the edge of the paper pattern.  This gave me an accurate layout for the stars. I was just going to wing it with the location but I just couldn’t get my head around the extra star on the clock points.  No matter how many times I tried to lay them out by eye, they just didn’t look right.  The pattern piece solved the problem and everything went smoothly.

Finished Wooden American Flag Wall Hanging


Wooden American Flag Wall Hanging Side ViewI am pretty happy with the way that this turned out.  I like the 3-dimensional nature of this flag.  The Stain colors, while not accurate, give the flag a nice rustic feel.  The grain of the pine shows through nicely giving it a warm comfortable feel.
It was fairly easy to put together and didn’t take a whole lot of time but does make a good impression.

If you feel like giving this one a try, let me know how it came out for you in the comments.

Live Edge Wood Slab Coffee Table

Live Edge Wood Slab Coffee Table

Over the years I have fallen in love with Live edge tables.  They seem to be quite popular in the marketplace now so I decided it was time to put together a Live edge wood slab coffee table.  My girlfriend’s son was moving into a new apartment and needed a table to complete his space so this seemed like a perfect time to put one of these together.

Back in the 90’s I had done a live edge cherry dining table.  One of my friend’s dad had decided that he wanted to duplicate his custom dining table as a gift for his daughter’s wedding.  He has property in the Adirondack mountains and just happened to have some fully dried slabs of cherry stored in a barn.  Checking the moisture content I was amazed to find this air-dried stack at 8%.  But I digress.  I’ll post on that project at another time when I can acquire some pictures of that table.

This project started with a trip to Everhart Lumber in Sweetwater TN. While their website is a bit antique, they do have a nice selection of slab lumber at their store in Sweetwater.  All of the slabs have been kiln dried in their wood-fired kiln and they have been sanded flat once the drying process is complete.

I purchased 3 slabs from them.  The most beautiful of these is a 2-inch thick piece of Black Walnut about 7 feet long.  It has a bit of a curve and is 3 feet wide at one end and 26 inches at the other.  I’m probably going to make this into a bar top.  The second slab is another 7 foot long and 28 inches wide mineralized Poplar board.  The third, another smaller piece of mineralized poplar.  I chose the smallest of these for the Live Edge Wood Slab Coffee Table.

Small Poplar Slab

Leveling the Top

The first thing I need to do with this board was to stabilize the bark on the edges.in the picture above you can see that there is some bark left on. The reverse side has quite a bit more bark. I had to decide whether I wanted to remove it all or leave it on and make sure that it wouldn’t fall off over time. Since I like the way that it looked I decided that I would stabilize it.

I mixed up a small single shot batch of West system epoxy with the 205-hardener and applied it with a foam brush.  Fresh epoxy wants to run so I need to continuously go back and gently move it to remove the drips until the reaction started. Once the epoxy started to catalyze I used a heat gun to raise the bubbles out of the epoxy. The second coat of the epoxy,  once the first was cured, was all that was needed to stabilize the bark.

The ends of the board had some significant imperfections that I wanted to remove. The ends were also ragged and not square to each other.  I chose an arbitrary point at either end and snapped a string line that I used this line to determine square.  Using a carpenter square I created a line at either end that removed most of the problem wood, then cut the board using a straight edge and a skill saw.

The slab had already been through a thickness sander so it was relatively flat but there were a lot of scratches from the sanding. They must’ve used a  rather course grit to flatten the board in their power sander. I put a 60 grit belt on my portable belt sander and went over the entire board with the sander at 30° to the grain this way I could see where I had sanded and where I had missed. Then I installed 100 grit sanding belt and sanded with the grain until all of the angled scratches were removed. At this point, I had a flat fairly smooth live edge slab table top.

When I flipped the board over and looked at the top, there were a few imperfections in the top that needed to be dealt with. I filled these with a mixture of epoxy and sawdust. Two applications were required to fill the cracks and level them with the surface.

I repeated the sanding process on the front of the board. First 60 grit then 100 grit. now the top was ready for final sanding.

The Bases

Since we were going for a rustic look, I decided that some of the offcuts from the Live Oak that I collected in South Carolina would work nicely for the bases under the table. When I started to chainsaw the Live Oak into slabs the first piece had some wonderfully twisted grain hiding underneath the bark. Instead of sanding this off, I decided to amplify it.

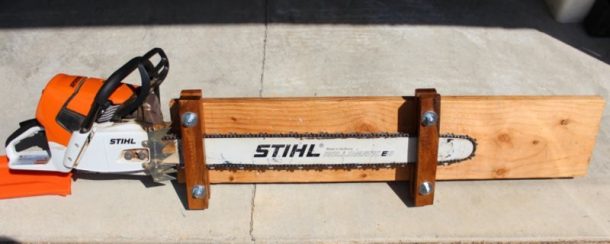
I started by removing all the bark with a four-inch grinder with a 36 grit sanding pad. Then, using a chainsaw, I cut the piece to rough length and sliced it down the middle. I was left with four pieces of Live Oak that basically look like quartersawn firewood.

I pulled out my jack plane  (Stanley #4) and smoothed one end of each piece then leveled the two inside flats.  I used a random oscillating sander with 60 grit then 100 grit to smooth the outer edge of the pieces and filled all of the wormholes that had developed in the sapwood.

Wood Boring beetles appear to have followed me from South Carolina to Tennessee.  They have infested the sapwood of the Live Oak. (Fortunately, they appear to be very specific to the Live Oak and to just the Sapwood.  The harder heartwood appears to be infestation free.)To make sure that these didn’t turn into a larger problem and get out into the woods in the area where I’m now living, I sealed every pinhole with epoxy. When I finished the Live Oak pieces for this table, I made sure that every nook and cranny was sealed with at least four coats of polyurethane. Any remaining beetle larva in these pieces should find it very difficult to breathe. All of the remaining oak that I have drying was treated with a product called Timbor. This is a borate solution designed to kill wood-boring insects. I have seen no further indication that the Beatles have survived this treatment. I am continuing to monitor for any sign of activity. Before I use any more of this wood, I will have it treated in a kiln that can reach 140°F to ensure complete eradication of all of these beetles.

When I had the three sides smooth and squared enough for my needs, I flipped the pieces on the squared up end and drew a line around the other end. I used a jig which was essentially a square piece of wood with a tall dowel attached at right angles. I measured up 18 inches and fastened a pencil through a hole drilled in the dowel. This gave me a rigid reference that aligned to a square surface and provided a reference line to precisely cut a square end on the other end.

I used a knife to deepen the marked line then cut with a Sawzall near the line. The knife cut kept the reciprocating saw from creating tearout as I cut the pieces to length. I finished leveling to the line with my Jack Plane and a Belt Sander.

Live Oak Bases after Initial sanding


With the 4 pieces leveled and reasonably square it was time for the finish.  I needed a durable finish and one that sealed the wood to keep the Boring beetle larvae inside the wood.  The Live Oak is also somewhat moist so I want any additional drying to happen slowly and not crack the supports.  Polyurethane fits the bill nicely for this.  I chose a satin finish.  A nice shiny surface is good for some things.  This rustic table didn’t need that level of shine.

I put on 4 coats.  Each coat was sanded with 220 grit sandpaper in a random oscillating sander and then fully dusted with a vacuum and a tack cloth.  The tack cloth leaves a sticky residue behind but this is dissolved by the next coat of Poly so it isn’t a problem with this finish.

The final coat was applied after finishing with 400 grit sandpaper.  This achieved the smooth hard finish that I was after and looks nice against the Poplar top.

The only remaining task was to fasten the base pieces together into a rigid structure to support the top.  I found some 5 inch angled brackets that held the pieces at a 90-degree angle.  This provided support to within 4 inches of the edges of the top and was sturdy enough to keep the top level and square to the floor.  A couple of pieces of foam shelf paper cushioned the irregularities and allows the variations in the top to be smoothed out.  It sits flat and square.

Here are the finished leg assemblies ready for the final application of finish.

Coffee Table Leg Assemblies

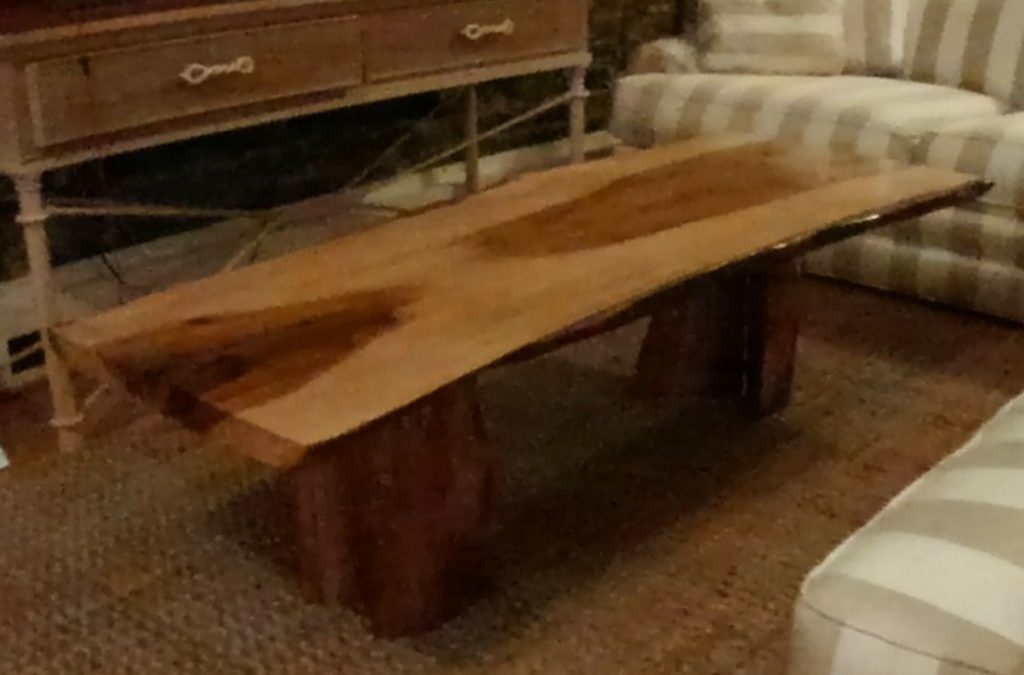
Here is the finished table in its final resting place.

Finished Live Edge Wood Coffee Table


Do you like the look of this table?  It was a fun project that took about 2 weeks to complete.  I’m sure that I can cut that time down on the next one.  I’m still rolling all of my tools back into storage each night and cleaning up the area so that the dust doesn’t get out of control.

Feel free to leave me a comment below and tell me what you think.


Outdoor Wood Bench Restoration

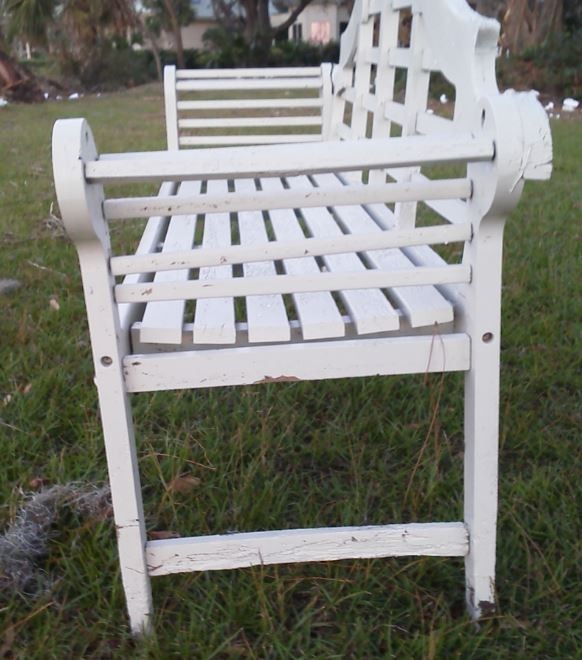
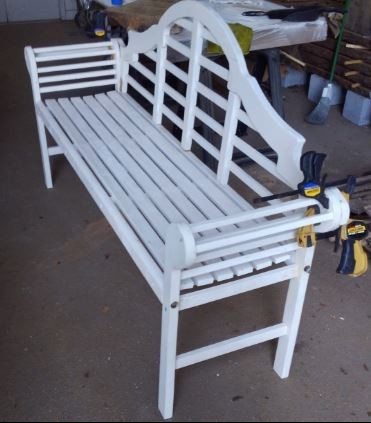
Over the years an outdoor wood bench sat looking over the 17th hole of the Heritage Golf Links.  Each night for about 20 years my girlfriend’s parents sat and watched the sunset over the Calabogie Sound.  Time and tide were not gentle on this bench.  When they passed their family wanted to remember them by restoring the bench to usable condition.  I was given the opportunity to restore this Outdoor Wood Bench.

The salt air and humidity took its toll on the legs of this bench, it wasn’t kept up very well.  While much of the wood of the bench was intact, significant rot had set in at the bottom of the legs and a poor paint job was flaking off. The joints were pulling apart and parts of it had pulled free from the fasteners.

Outdoor Wood Bench Restoration

The final blow came during hurricane Mathew in 2016.  With insufficient warning, we didn’t have time to visit the Island and secure the property before it was evacuated.  The bench remained exposed to the full force of the storm. The wind blew the bench into a Pine Tree near the shore.  The Pine promptly fell on the bench and cradled it from the tide keeping it from washing away.  I think that there were outside forces protecting this bench.

It did take some significant damage though.  One of the ends was almost completely pulled off and several of the spindles were snapped.  This outdoor wood bench was in need of some serious work.

Tearing the Bench Apart

The first order of business when I started working on this bench was to remove the ends and basically dismantle the bench to reach the problem areas. I started trying to unscrew the fasteners after popping the buttons loose. There wasn’t one screw that wasn’t rusted so badly that it either stripped out or broke as soon as I tried to remove it. The ends of the bench were attached to the seat using barrel bolts these were so badly rusted that I just grabbed the drill bit and started removing them a shaving at a time. Basically, I drilled out all of the fasteners. It took a while but eventually, I had the seat removed from the ends and the back removed from them.

The next order of business was to remove as much paint as possible so I pulled out my Sanders with a 60 grit pad went to work removing everything from the seat that was loose. I found some amazingly hard clear wood underneath. It was similar to oak in density but nice clear straight grain.

I also removed the loose paint from the back where I could reach it and try to smooth the wood on the back as much as possible so that it would take paint when it was time to repaint the bench.

Finding Free Wood

I still don’t know what tropical hardwood the bench was made of. It looks like some sort of Honduran mahogany or something of that sort. I figured I’d need something like Red Oak to replace the parts I needed to replace but I really didn’t want to go down to the wood store and purchase any.

I did happen to have a stack of pallets laying around and I thought if I could get all the nails out might be able to use some of that wood. I found a few pieces that had a nice heavy feel to them and, I just happen to have gotten all the nails out of those particular pieces. I still wasn’t sure what species they were but I thought perhaps they would do for what I was trying to do. I knew I was going to paint the bench at the end so I didn’t really need to have a specific species of wood.

Pulled out my portable planer, went over each board very carefully to make sure there was no metal left and then ran them through the planer to match them to the thickness of the parts that I needed. This thickness turned out to be 1 1/8 inches. I was pleasantly surprised to find that the species that I was working on was actually Red Oak. With about 6-2 by 4s from the pallet wood, I figured I had enough pieces to make what I needed. There was definitely some careful cutting that needed to be done to get my stock prepared but that is always part of the process.

Some Complex Joinery

I didn’t really want to replace the entire legs on each of the benches. Only about the bottom 10 inches were damaged on each of the legs. I really needed to just replace that portion. I know that I could scarf a piece onto the bottom of each with just a 4-1 angle and it probably would’ve held but I thought that some additional strength would probably be appropriate.

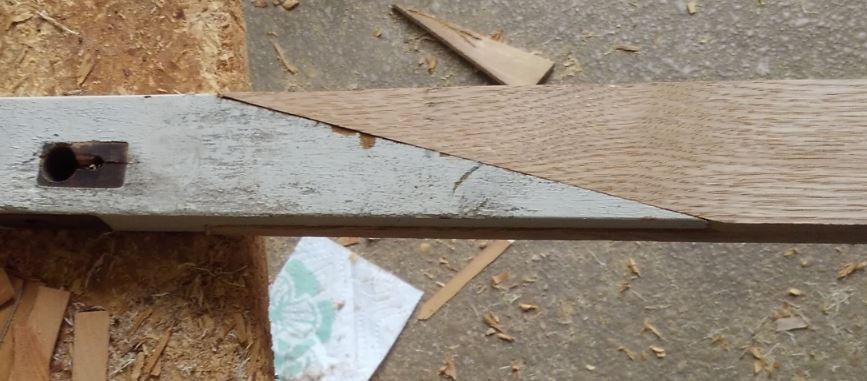
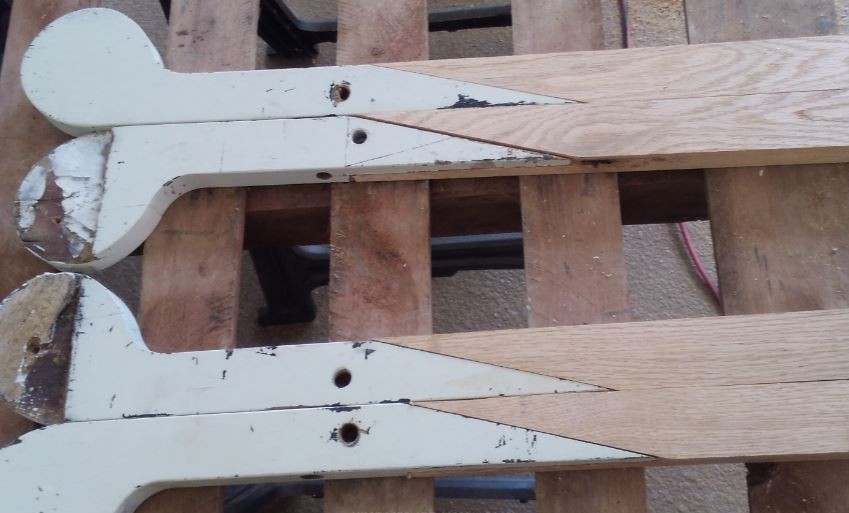
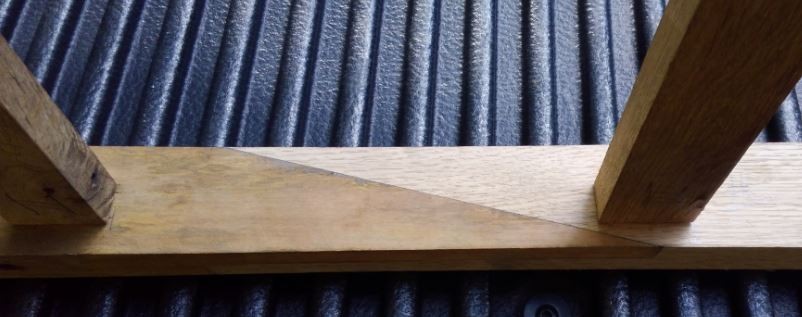
I settled on a timber framing joint known as the scissor joint. It’s probably overkill in this situation but it provides support in the right direction and is self-aligning when it is cut correctly.

The scissor joint is two angled cuts on each piece one comes in from each side halfway through the part. You make one scissor joint on the bottom piece and one more on the top piece, then glue the two pieces together. You have a strong joint that doesn’t flex side to side. the main strength of the joint is longitudinal.

Here’s a video that explains how to cut this joint for a timber frame. I just scaled it down.


Here is the finished Scissor Scarf Joint on one of the legs.

Scissor Scarf Joint

After I had completed 4 legs it was time to start cutting some mortise and tennons for the spreaders that connect the legs together.

Complete Scissor Scarf Joints


Spindles and Spreaders

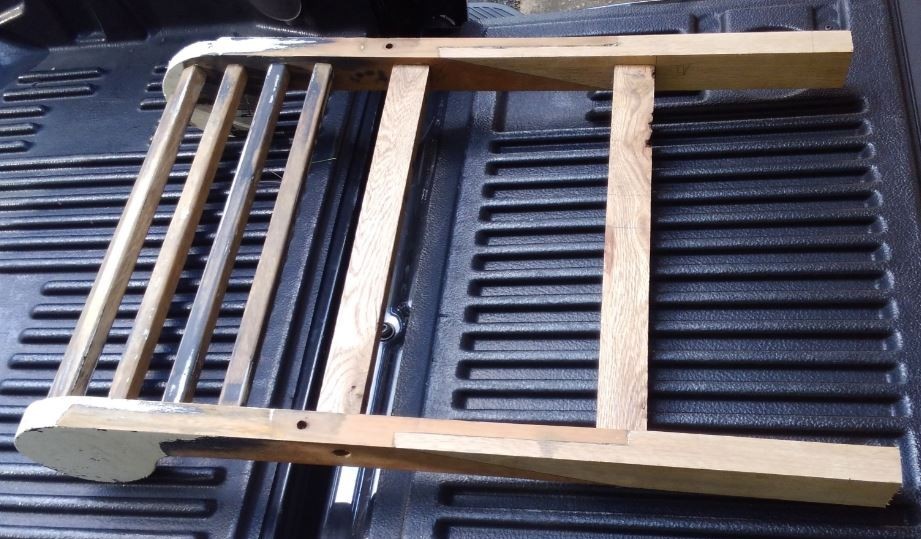
There were broken spindles from when the tree fell on the top of the bench and the spreaders at the middle and bottom of the end assemblies were either rotted or broken.  I needed to make new spreaders and replace a few of the spindles.

Spreaders

The spreaders needed a mortise and tenon joint.  Originally the bench used dowels and screws to hold the spreaders on.  I just can’t bring myself to use this kind of joinery.  It doesn’t hold up over time and the mortise and tenon are much more secure and forces everything into a nice rigid square assembly.

I set up the Radial Arm saw to cut the wide parts of the joint and just used a dovetail saw and a chisel to remove the leftover edges.  It takes less time to drop back to hand tools than it takes to set up the saw for another cut.  Since I was only doing 8 tennons it made sense to use the hand tools.

I always lay out the cut lines with a knife instead of a pencil.  By using a knife cut you prevent tear out on the visible mating surface.  Once I have cut near the line with the Radial arm saw, I clean up the edges with a sharp chisel anyway.  It is much easier to be precise with hand tools.

Here you can see one of the scarf joints and the spreaders in place.

Scarf Joint and Spreaders

Spindles

Several of the spindles had been broken but most of them were still intact.  I cleaned up the paint taking it down as far as necessary to get a smooth paintable surface.  I cleaned up the glue surfaces and cleaned the old glue out of the holes with a drill bit.

I still needed to replace about 6 of the spindles.  These were cut from the Red Oak from the pallets. The only thing that was difficult about the spindles was getting a dowel on the ends that would fit into the holes.  If I had a dowel cutter I could just insert the spindle and let the tool do the work.

I ended up hand cutting the round dowel pins from the ends of the spindles.  While a bit tedious, it wasn’t difficult to do.  I marked the length I needed and scored a line around the spindle.  A quick cut on each of the corners with a dovetail saw and a little chisel work brought the square to a circle.

Here’s one end assembly with the spreaders and spindles reinstalled.

Outdoor Wood Bench End Assembly


You might notice a big ol’ knot in the lower spreader.  Since the bench will be painted I just filled the ragged edge with a bit of West System Epoxy thickened with their microfibers.  This filled the defect and is pretty easy to sand flush when you need to get it level.  If you let the Epoxy set for about 2 hours it is easy to work with a chisel.  Leave it overnight and you will be working with a hard surface that can only be leveled with a sander or some serious elbow grease.  I used this mix to fill in the gaps around the scarf joints as well.

Reassembling the Bench

When I took the bench apart I drilled out several screws broke off a bunch more and basically made a mess of the attachments that originally held this bench together.  Now it was time to get some screws and lag bolts to go into these places where there was still metal.  I decided that digging out all the old screws was an exercise in futility so I filled all of the old holes where the screws were and offset the old holes by 1/4 to 1/2 an inch.

I used 3/8 inch Lag bolts through the end assemblies and 1/4 inch lag screws to hold the back to the seat.  I drilled these for dowels so that I could cover up the fasteners.

Before I reassembled the parts, I gave everything a coat of paint.

When the bottom of the back was attached and the sides in place I mixed up some epoxy and glued the ends of the back to the round ends of the bench ends.

The original fastening for the ends of the bench used 2 woodscrews through the center of the overlapping pieces.  I decided that this wasn’t a strong enough joint.  I filled where the original screws joined the back and sides together with a dowel and when the initial epoxy had cured, I drilled four more dowel holes.

These dowel holes went through the back and into the side piece. I think they will provide enough additional strength to keep the back in place for many years.  The dowels were also bedded in Epoxy.  When sanded flush these dowels disappear into the part.  After painting they will be invisible.

Outdoor Wood Bench Glue upIn this picture, I have Epoxied the ends and back together.  I clamped them together while the Epoxy set.  You can see the lag bolts holding the legs in place.
Wrap Up

Overall this was a fun project to do. My general impressions of the bench itself and its design are mixed. I like the way that the seat was curved, it is quite comfortable to sit on the seat. I’m not a big fan of how the back feels when you lean back on it. If I were to design this bench for this look I would definitely do half lap joints so that the cross pieces were level with the upright pieces on the back. This would make for a much more comfortable bench. I do like the way that the back tilts back about 10°.

I think the spindles on the arms are ridiculous. I would’ve designed these quite differently.

For comfort, I don’t think this bench works but it does have a nice ambiance sitting in the yard. With luck, my modifications will give this bench a new lease on life and last for many years.

I am always pleased when I can recycle an old piece of furniture and restore it to its former glory.  In this case, the bench is probably better than the original design.  The fasteners are updated and the attachment for the back is stronger than originally designed.

Let me know what you think of my work in the comment area below.  I’d love to hear what you think.

Refinishing Teak Furniture

Refinishing Teak Furniture

Last year we finished up the repairs on the house in South Carolina. On the back porch, there were a couple of wooden chairs that had been sitting out in the weather for many years. While they were gray and had moss growing on them, I could tell that they were nice quality furniture. I suspected that they were teak but before I got started I wasn’t sure what wood they were made from. In any event, I decided that it was time to clean these up and see if there was anything under the grime. Here is the process that I use for refinishing teak furniture.

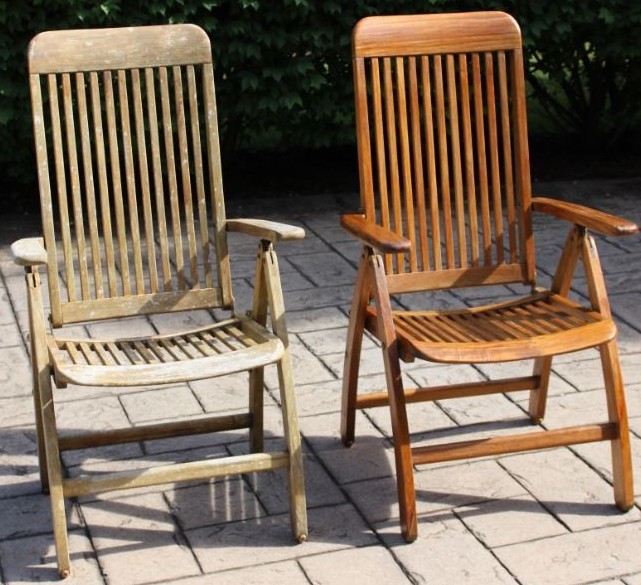
This is a picture of the chair before I started. you can see how gray the wood is turned and you can see bits of varnish that are clinging to the surface.Teak Lawn Chair Before Refinishing

I started with a green scrubby pad and some water. I went over the entire pair of chairs and removed as much of the algae as possible. The chair started looking a little bit better but it had a long way to go.  The wood showed its potential when wet with a nice brown patina that disappeared as the chair dried. There was not much finished left but in places, there was just a touch of some sort of lacquer holding on by the skin of its teeth.

For the first chair, I decided that I would try to use my cabinet scrapers.  After putting a fresh edge on each of the scrapers I started the tedious process of removing the clinging finish and scraping down all of the surfaces. The grain had been raised in a few places from exposure to excessive amounts of water. I spent the better part of three days scraping the wood down to a clean surface and smoothing it to the best of my ability. In a few places, I used some sandpaper although I found that it didn’t leave nearly the smooth surface that I was getting from the cabinet scrapers.

While I was sanding these chairs, I considered dismantling them but I was able to reach all but a small portion so I figured that it would be more trouble than it was worth to take them apart and then reassembled them. I did find a crack in the support for the seat. Using a small screwdriver I opened up the crack and injected in some carpenters glue. After clamping it and leaving it overnight it appeared to have provided the necessary support for this section of the seat. This was the only repair that needed to be done on this chair.

When I thought I was done, I soaked the chair with water to raise the grain in the wood. In some places, this exposed where I needed to remove more of the varnish, in other places it raised the grain and needed to be re-sanded. When I was finished with the touchups I went over the entire chair with a tack cloth to remove all traces of sanding dust.

Now it was time to start applying finish to the chair.  I have always been a fan of Tung oil for items of this sort.  The oil finish works well with Teak.  Teak has natural oils in it that can repel some hard finishes like Polyurethane.  However, Tung oil is an indoor finish.  It contains no UV blocking additives so may not be the right finish for a chair that is going to be outside in the sun and weather unprotected.  After doing a bit of research into the various oil finishes I found that the right oil to use in this application should be Teak oil. Teak oil contains an additive that blocks Ultraviolet rays, it is also formulated for outdoor use.

I did, however, have a can of tung oil so I applied three coats of tung oil. the sanded wood was very thirsty. It absorbed the first coat of oil almost immediately. I let the tung oil dry for several hours then reapplied another coat. I let this dry overnight. In the morning I resanded all the surfaces with 400 grit wet dry sandpaper. After cleaning all the sanding dust with a tack cloth, I applied the third coat of tung oil. I could’ve stopped at this point but I decided after doing my research that at least one coat of teak oil needed to be applied. I didn’t have any teak oil available so I put this chair aside to dry while I worked on the second chair.

Teak Chairs one Refinished

With the second chair, I decided to take a slightly different tactic.  I pulled out my random oscillating sander and put a fresh 100 grit disc on it.  Then I strapped on a respirator and went to work. I power sanded the chair with the random oscillating sander then worked on the details in the corners and between the slats with an oscillating multi-function tool with a triangular sanding attachment.  I still had to get out the cabinet scrapers or some of the detail work but the work went faster.  I completed the sanding by hand with 400 grit sandpaper.  I wrapped the sandpaper around a small dowel to help reach in between the slats.

The second chair had one seat slat that was broken.  There was a knot in this slat that failed and the slat was cracked about 70% of the way through.  I tried carpenters glue but the break continued to open up.  I upgraded to Epoxy and allowed this to set but the same problem reoccured.

Damaged Teak Slat

After thinking about how to effect a repair without disassembling the seat, I finally settled on reinforcing the underside of the slat with a piece of wood that spanned the break.  Basically, I needed to install a spline.

I flipped the chair over and clamped a piece of 1/4 inch plywood to the bottom of the seat between the front and back rails.  Then I installed a pair of guides to keep a router moving in a straight line centered over the broken slat.  I put a 1/4 inch router bit into my router and made multiple passes until I was about 3/8 of an inch deep.  With the slot cut, I epoxied a Red Oak spline with absolutely straight grain and no defects across break into the slot that I cut.  I filed a round-over on the ends of the spline to fit the round slot created by the router bit. Once the Epoxy was set, I sanded it flush with the bottom of the slat.

Repaired Teak Slat with Spline Installed

While the repair isn’t completely invisible, it is on the underside of the seat so it doesn’t interfere with the aesthetics of the chair.  It seems to be holding up well to repeated use.  I would have to say it is a successful repair.

With the repair completed, I finished the second chair with 4 coats of Teak oil.  I also gave the first chair a final fourth coat with the teak oil.  The Tung oil and Teak oil are similar products that are fully compatible with each other.  The Teak oil will provide some UV resistance so that the sun will not be a problem with the long term wear of the finish.

Here are the two chairs renewed and ready for another Quarter Century of use.  I may find that the finish needs to be renewed in a few years but I’m confident that if we stay on top of the finish these chairs will look and perform well for a long time yet.

Refinished Teak Lawn Chairs

I think power sanding reduced the amount of time required to clean this chair but the finishing work was still tedious.  The final outcome was similar but the color is a bit lighter.


Stay on Top with Woodworking Warrior

Join the mailing list to receive the latest news and updates from us!

You have Successfully Subscribed!

Pin It on Pinterest