On the Alaskan Sawmill Project page I discussed putting together an Alaskan Sawmill jig that will allow me to keep the slabs that I take from these trunks level and untwisted.
Moving a Live Oak Log
Before I could start to mill these boards I had a few adjustments to make to the jig and I needed to move the first piece of oak from the pile where they have rested all year to a place where I can work on the tree.

My options were limited. The first piece is about 18 inches in diameter at the wide end and 9 feet long. Live Oak weighs about 75 lbs per square foot when the water content is at 75%. So I’m trying to move a log that weighs a bit more than 1200 lbs. Not something that can be lifted and moved easily. I do have a 42 inch peavy that allows for rolling the log but no amount of pulling without assistance will move this log.
I happened to have a come-along that is rated at 5000 lbs. I figured that this would be sufficient overkill to move this log. My problem was that the chain I typically use for securing the end of the log to the come-along hook was not with me. It was tucked safely away about 450 miles to the North-West. I was able to purchase some generic nylon rope but it isn’t rated anywhere near what I needed. I was hoping that a doubled length of the line secured to the trunk with a timber hitch would be sufficient for my needs.
This did appear to be a good solution. I connected the come-along to the trunk and started to crank. I was able to inch the trunk out of the pile and drag it. I took a minute to find a few small straight round branches about 3 feet long and positioned them in front of the log so that as I moved it the log would climb up onto the branch and they would act as rollers to make moving the tree easier. I only ended up pushing the roller logs.
Next, I tried to make an inclined plane, I cut a wedge off the end of a smaller tree, jammed the thin edge under the log that I was trying to move. When I pulled the log forward it climbed the wedge and got up on top of the roller logs. This made moving the log much easier. By changing the orientation of the logs as I pulled, I was able to direct the big Oak log.
Now that the Oak trunk was on rollers, I was able to move it into position. As I reached the limit of the cable on the come-along, I refastened the anchor to nearby trees and resumed cranking away at the handle of the come-along until the tree was in position.
Preparing the Log for Milling
The log has been positioned on a flat surface and is now supported on smaller logs. I cut a couple of more support logs with notches in them to prevent the large Oak log from rolling while I cut it. The large log needed to be rolled onto these supports and the heart crack in the log needed to be oriented parallel to the planned cuts.
Using the Peavy, I rolled the log into position adjusting the location of the notched supports until the log dropped into the notches in the correct orientation.
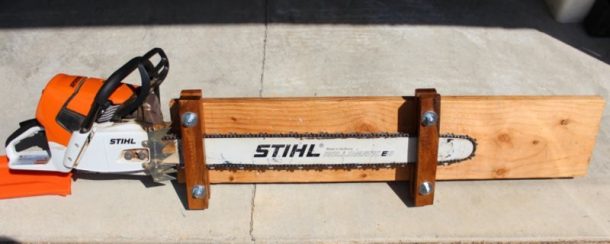
Next, I needed a reference surface to guide the jig. In the video by David Groth that I embedded in the Alaskan Sawmill Page, he used a pair of 2 x 4s attached together by a plywood spacer. I have seen many videos that used a section of aluminum ladder for this task. I had a section of ladder but needed to devise a way to attach the ladder securely to the top of the log.
I picked up a few aluminum hose clamps and cut off the screw end with a hacksaw leaving a 6 inch strap with notches I then screwed these down to the top of the log. I used 2 straps for each ladder rung at the ends of the log making sure to level the ladder on the log.

To check the level and make sure that the ladder wasn’t twisted I set two straight 2 x4s crosswise at each end of the ladder and used them like winding sticks to check the straightness of the fasteners. It took a bit of adjustment to get the ladder straight and true and securely fastened to the log. I was concerned that the 3 inch screws used to hold the clamps to the log would interfere with the first cut. I added an additional inch of spacers to my jig to compensate. A chainsaw chain doesn’t stand up well to cutting metal. It will dull almost instantly when it hits even a small piece of metal.

The First Cut
I have the log in place, I have a reference surface attached, now its time to set up the jig.
I measured from the top of the ladder down to where I expected to find the end of the 3 inch screws holding the ladder in place. I then added an additional inch. This gave me a 7 inch measurement. I have spacers cut that fit onto the 1/2 inch threaded rod. The jig needs to have an additional 5 inches of spacers added as the minimum cut with the clamps installed is 2 inches. I added 3 inch and a half spacers and one 1/2 inch spacer to bring the depth to the full 7 inches. I checked the clamping pressure and tightened down the nuts holding the clamps together.
Then it was time to warm up the saw. First, I checked the fuel supply and refilled the bar oil. The saw started on the first pull so that was nice. It was after all a new saw. There was no time on it. I rechecked the chain tension, it seemed to be fine. Just as a precaution I loosened up the tension and checked it. Something was wrong with the adjuster but since the tension appeared to be correct and I hadn’t any experience with this saw I assumed it was something I was doing wrong.
I went ahead and started the first cut. Less than a foot into the log the chain popped off the bar. The drive links were damaged and the chain was toast. As I was taking the chain off, I examined the chain tensioner and found that the screw controlling the tensioner was bent. I can only surmise that this was the problem that I experienced when trying to adjust the tensioner for the first time.

I had purchased the saw in Knoxville but was in South Carolina at the time. So, I found the nearest Stihl dealer and identified the parts that were needed. The Stihl 661C was still under warrantee but the employee at the counter wasn’t the regular Stihl mechanic. The employee was able to locate the parts I needed but I needed to purchase them instead of getting them under the warrantee. I also paid for a new chain. It made me sad that I lost the time messing with all of these problems and had an additional outlay of cash after all the money I spent on this Stihl professional chainsaw.
I was able to complete the repair and get the chain tensioner working correctly that evening. I lost about 3 hours out of my day but had a functioning saw and a new crosscut chain so I should be good to go.
The next morning I fired up the saw and finished the cut. Perfect performance and the new sharp chain treated the Live Oak like butter. I had high hopes that this would be an easy job. I removed the ladder and all of the clamps and screws holding them. None of the screws had penetrated to the depth of the first cut.

I started the second cut and almost immediately saw sparks. Now the clamp had come loose and the chain impacted the 3/8 bolts holding the clamp. My new chain was now dull and damaged.
A rough start to my first round of chainsaw milling.
To top it all off, I had now run out of time and needed to return to Knoxville. The Live Oak will have to wait for another day.
On a lighter note, I have a friend with a chainsaw sharpener in Knoxville so I was able to get the chain resharpened. I also ordered a rip chain to see if the different chain angle has an effect on how well the saw cuts. I was able to test this new chain on my next log. The Black Cherry Sawmill Project details the fine-tuning of the jig and the first successful slabbing of a log with my new Alaskan Sawmill.