Over the years an outdoor wood bench sat looking over the 17th hole of the Heritage Golf Links. Each night for about 20 years my girlfriend’s parents sat and watched the sunset over the Calabogie Sound. Time and tide were not gentle on this bench. When they passed their family wanted to remember them by restoring the bench to usable condition. I was given the opportunity to restore this Outdoor Wood Bench.
The salt air and humidity took its toll on the legs of this bench, it wasn’t kept up very well. While much of the wood of the bench was intact, significant rot had set in at the bottom of the legs and a poor paint job was flaking off. The joints were pulling apart and parts of it had pulled free from the fasteners.
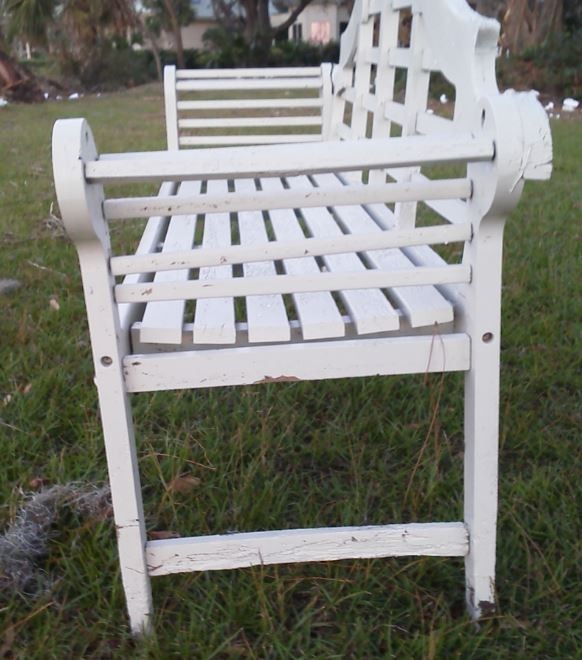
The final blow came during hurricane Mathew in 2016. With insufficient warning, we didn’t have time to visit the Island and secure the property before it was evacuated. The bench remained exposed to the full force of the storm. The wind blew the bench into a Pine Tree near the shore. The Pine promptly fell on the bench and cradled it from the tide keeping it from washing away. I think that there were outside forces protecting this bench.
It did take some significant damage though. One of the ends was almost completely pulled off and several of the spindles were snapped. This outdoor wood bench was in need of some serious work.
Tearing the Bench Apart
The first order of business when I started working on this bench was to remove the ends and basically dismantle the bench to reach the problem areas. I started trying to unscrew the fasteners after popping the buttons loose. There wasn’t one screw that wasn’t rusted so badly that it either stripped out or broke as soon as I tried to remove it. The ends of the bench were attached to the seat using barrel bolts these were so badly rusted that I just grabbed the drill bit and started removing them a shaving at a time. Basically, I drilled out all of the fasteners. It took a while but eventually, I had the seat removed from the ends and the back removed from them.
The next order of business was to remove as much paint as possible so I pulled out my Sanders with a 60 grit pad went to work removing everything from the seat that was loose. I found some amazingly hard clear wood underneath. It was similar to oak in density but nice clear straight grain.
I also removed the loose paint from the back where I could reach it and try to smooth the wood on the back as much as possible so that it would take paint when it was time to repaint the bench.
Finding Free Wood
I still don’t know what tropical hardwood the bench was made of. It looks like some sort of Honduran mahogany or something of that sort. I figured I’d need something like Red Oak to replace the parts I needed to replace but I really didn’t want to go down to the wood store and purchase any.
I did happen to have a stack of pallets laying around and I thought if I could get all the nails out might be able to use some of that wood. I found a few pieces that had a nice heavy feel to them and, I just happen to have gotten all the nails out of those particular pieces. I still wasn’t sure what species they were but I thought perhaps they would do for what I was trying to do. I knew I was going to paint the bench at the end so I didn’t really need to have a specific species of wood.
Pulled out my portable planer, went over each board very carefully to make sure there was no metal left and then ran them through the planer to match them to the thickness of the parts that I needed. This thickness turned out to be 1 1/8 inches. I was pleasantly surprised to find that the species that I was working on was actually Red Oak. With about 6-2 by 4s from the pallet wood, I figured I had enough pieces to make what I needed. There was definitely some careful cutting that needed to be done to get my stock prepared but that is always part of the process.
Some Complex Joinery
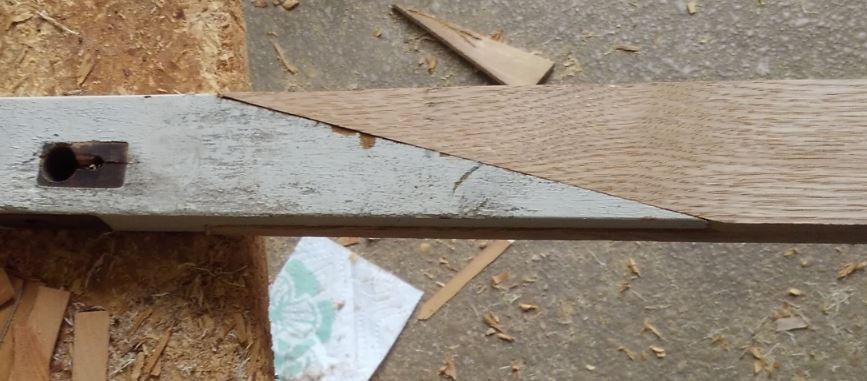
I didn’t really want to replace the entire legs on each of the benches. Only about the bottom 10 inches were damaged on each of the legs. I really needed to just replace that portion. I know that I could scarf a piece onto the bottom of each with just a 4-1 angle and it probably would’ve held but I thought that some additional strength would probably be appropriate.
I settled on a timber framing joint known as the scissor joint. It’s probably overkill in this situation but it provides support in the right direction and is self-aligning when it is cut correctly.
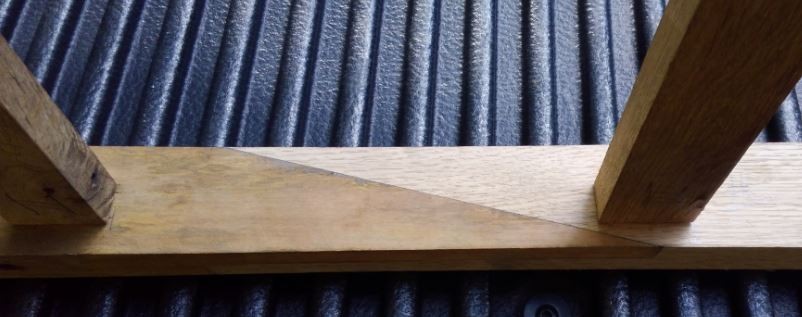
The scissor joint is two angled cuts on each piece one comes in from each side halfway through the part. You make one scissor joint on the bottom piece and one more on the top piece, then glue the two pieces together. You have a strong joint that doesn’t flex side to side. the main strength of the joint is longitudinal.
Here’s a video that explains how to cut this joint for a timber frame. I just scaled it down.
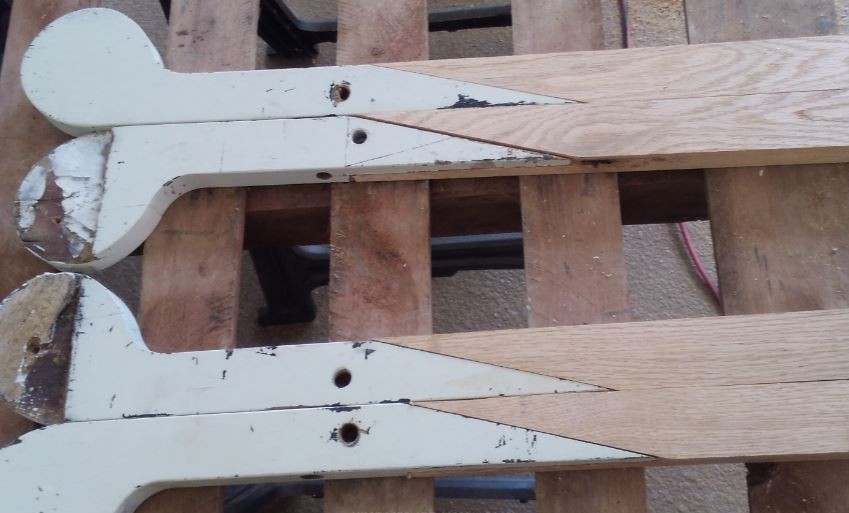
Here is the finished Scissor Scarf Joint on one of the legs.
After I had completed 4 legs it was time to start cutting some mortise and tennons for the spreaders that connect the legs together.
Spindles and Spreaders
There were broken spindles from when the tree fell on the top of the bench and the spreaders at the middle and bottom of the end assemblies were either rotted or broken. I needed to make new spreaders and replace a few of the spindles.
Spreaders
The spreaders needed a mortise and tenon joint. Originally the bench used dowels and screws to hold the spreaders on. I just can’t bring myself to use this kind of joinery. It doesn’t hold up over time and the mortise and tenon are much more secure and forces everything into a nice rigid square assembly.
I set up the Radial Arm saw to cut the wide parts of the joint and just used a dovetail saw and a chisel to remove the leftover edges. It takes less time to drop back to hand tools than it takes to set up the saw for another cut. Since I was only doing 8 tennons it made sense to use the hand tools.
I always lay out the cut lines with a knife instead of a pencil. By using a knife cut you prevent tear out on the visible mating surface. Once I have cut near the line with the Radial arm saw, I clean up the edges with a sharp chisel anyway. It is much easier to be precise with hand tools.
Here you can see one of the scarf joints and the spreaders in place.
Spindles
Several of the spindles had been broken but most of them were still intact. I cleaned up the paint taking it down as far as necessary to get a smooth paintable surface. I cleaned up the glue surfaces and cleaned the old glue out of the holes with a drill bit.
I still needed to replace about 6 of the spindles. These were cut from the Red Oak from the pallets. The only thing that was difficult about the spindles was getting a dowel on the ends that would fit into the holes. If I had a dowel cutter I could just insert the spindle and let the tool do the work.
I ended up hand cutting the round dowel pins from the ends of the spindles. While a bit tedious, it wasn’t difficult to do. I marked the length I needed and scored a line around the spindle. A quick cut on each of the corners with a dovetail saw and a little chisel work brought the square to a circle.
Here’s one end assembly with the spreaders and spindles reinstalled.
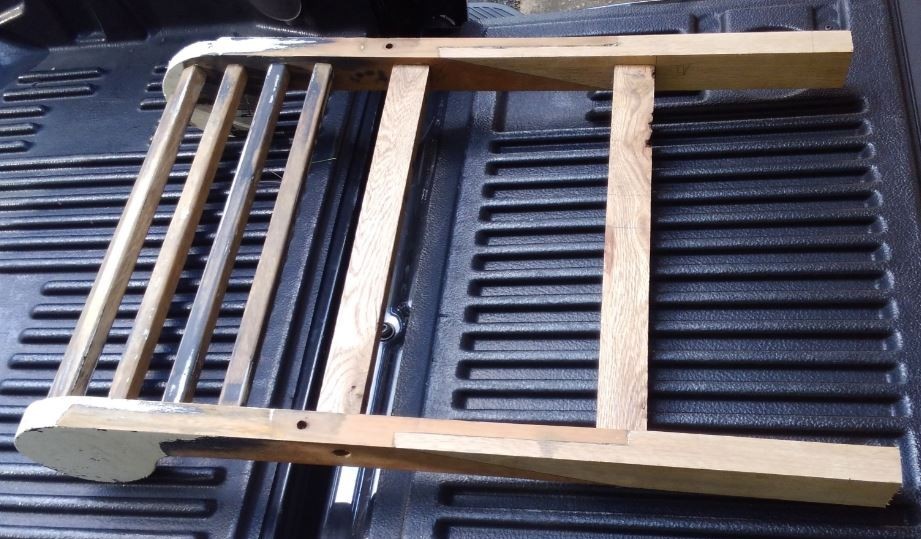
You might notice a big ol’ knot in the lower spreader. Since the bench will be painted I just filled the ragged edge with a bit of West System Epoxy thickened with their microfibers. This filled the defect and is pretty easy to sand flush when you need to get it level. If you let the Epoxy set for about 2 hours it is easy to work with a chisel. Leave it overnight and you will be working with a hard surface that can only be leveled with a sander or some serious elbow grease. I used this mix to fill in the gaps around the scarf joints as well.
Reassembling the Bench
When I took the bench apart I drilled out several screws broke off a bunch more and basically made a mess of the attachments that originally held this bench together. Now it was time to get some screws and lag bolts to go into these places where there was still metal. I decided that digging out all the old screws was an exercise in futility so I filled all of the old holes where the screws were and offset the old holes by 1/4 to 1/2 an inch.
I used 3/8 inch Lag bolts through the end assemblies and 1/4 inch lag screws to hold the back to the seat. I drilled these for dowels so that I could cover up the fasteners.
Before I reassembled the parts, I gave everything a coat of paint.
When the bottom of the back was attached and the sides in place I mixed up some epoxy and glued the ends of the back to the round ends of the bench ends.
The original fastening for the ends of the bench used 2 woodscrews through the center of the overlapping pieces. I decided that this wasn’t a strong enough joint. I filled where the original screws joined the back and sides together with a dowel and when the initial epoxy had cured, I drilled four more dowel holes.
These dowel holes went through the back and into the side piece. I think they will provide enough additional strength to keep the back in place for many years. The dowels were also bedded in Epoxy. When sanded flush these dowels disappear into the part. After painting they will be invisible.
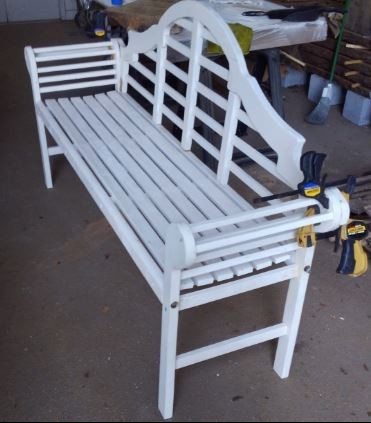 In this picture, I have Epoxied the ends and back together. I clamped them together while the Epoxy set. You can see the lag bolts holding the legs in place.
Wrap Up
Overall this was a fun project to do. My general impressions of the bench itself and its design are mixed. I like the way that the seat was curved, it is quite comfortable to sit on the seat. I’m not a big fan of how the back feels when you lean back on it. If I were to design this bench for this look I would definitely do half lap joints so that the cross pieces were level with the upright pieces on the back. This would make for a much more comfortable bench. I do like the way that the back tilts back about 10°.
I think the spindles on the arms are ridiculous. I would’ve designed these quite differently.
For comfort, I don’t think this bench works but it does have a nice ambiance sitting in the yard. With luck, my modifications will give this bench a new lease on life and last for many years.
I am always pleased when I can recycle an old piece of furniture and restore it to its former glory. In this case, the bench is probably better than the original design. The fasteners are updated and the attachment for the back is stronger than originally designed.
Let me know what you think of my work in the comment area below. I’d love to hear what you think.

